
Hi all,
I finally found a shop in town that doesn't mind doing the initial base grind on my freshly pressed skis.
The guy is open to suggestions to dial-in the way he does it so I can get the best result. It's a new shop, friend of a friend, he bought used machines recently so not much experience in ski tune-up, neither do I.
He's been working on a pair of skis over the week end with a belt he had on hand. I know he buys his belts from a local manufacturer, they're not ski specific. The belt he's been using is a 100 grit.
What he told me is he spent almost half an hour sanding the skis with this belt and he was stil not able to remove all the excess epoxy (though it might be the pair where I have the smallest amount of epoxy on the bases..). I suspect a worn out belt is the culprit but he was talking about buying a new belt with a more agressive grit (80 I believe).
Here is my question :
Can someone explain quite precisely how to do the initial tune-up on new skis : belt type, belt grit, how long/how many passes should it take (aprox.)... the "basics" of the process I guess...
My skis come out of the press pretty flat (not perfect but close), some epoxy here and there but really not much...
Any help will be appreciated !
Aside from finding this guy I'm still looking for a used machine for my shop (wet belt sander) so I can do that myself, if someone is aware of a cheap used wet belt sander in eastern Canada / Northern New England, I'm open to suggestions ! It has to be able to handle wide skis / splitboards.
Thanks !
Ben
base sander / belt grit
Moderators: Head Monkey, kelvin, bigKam, skidesmond, chrismp
base sander / belt grit
A bad day skiing is always better than a good one at work...
Ben. Key is to be aggressive. If its autofeed, it's gonna take forever. If you do 3/4 edge you need to be carefull in the tips. I grind with 100 grit and takes me about 30-45 min to do a set.
I have a really nice condition 6 inch allstone I'm selling soon. I'll send you some pics. We're looking for $700. Probably $300 to ship it canadian freightways.
I have a really nice condition 6 inch allstone I'm selling soon. I'll send you some pics. We're looking for $700. Probably $300 to ship it canadian freightways.
-
MontuckyMadman

- Posts: 2395
- Joined: Fri Jun 20, 2008 9:41 pm
Ben, the epoxy is slicker and harder than the base. In my opinon its more time efective to manually scrape as much of the epoxy fom the edge and base before takin it to the belt. The prob with ceramic and silicon carbide belts is they wear fast with the epoxy. Gonna want to get some hermes zirconia belts from svst and he can use those for your stuff. Good luck. Half an hour sounds about right to get them clean and flat. Sounds like he needs to let you use the machine.
sammer wrote: I'm still a tang on top guy.
The hardness of the epoxy isn't going to be the issue when the edges are steel. Base material will always be slicker ...
Zia.ch appears to over specify the thickness of their base material. The logic must be that they prefer to grind the base down to the edge and avoid grinding the base and the edge. This then ensures their product leaves the showroom per design specifications.
The extent of any difference in material specification may well be defined by the type of cassette - I don't know for sure. With an open cassette (without boarders) you may only get away with 0.05 - 0.075mm.
The alternative approach would be to tape the butt joint (base/edge set), something like 15mm, but this is just a cosmetic fix to the underlying problem. If the problem is severe, an approach might be to add 0.5 degree bevel to the base edge before taking them down to ski tech. Run the skis through on a damp belt, 80 grit belt a couple of times - staying aware of how much heat is being generated. Add water for the next couple of passes and then switch over to 120.
Half an hour grinding the base and there is a larger underlying problem to be fixed.
-
knightsofnii
- Posts: 1148
- Joined: Tue Jan 08, 2008 6:02 am
- Location: NJ USA
- Contact:
-
MadRussian
- Posts: 712
- Joined: Thu Sep 30, 2010 12:32 pm
- Location: USA
Belt Sander in the shop have auto- feed? If so did he adjust the pressure? 100 grit definitely too high to start with. My belts are 80 and 120 aluminum oxide and didn't find any problems removing epoxy. Probably dozen passes on 80 and 10 on 120 that's about it
I have not failed. I've just found 10,000 ways that won't work.
Thomas A. Edison
Thomas A. Edison
-
MontuckyMadman
- Posts: 2395
- Joined: Fri Jun 20, 2008 9:41 pm
I'm with MM, my Wintersteiger snb60 came with Norton 100 grit belts and takes about 20min to make two skis ready for the stone.
And one other thing for the flatness, don't forget to rabbet the core alt. fill the gap with something(not necessary fiber, unless you know what you're doing)...otherwise the base will look like the moon.
...and it will take longer time on the stone
And one other thing for the flatness, don't forget to rabbet the core alt. fill the gap with something(not necessary fiber, unless you know what you're doing)...otherwise the base will look like the moon.
...and it will take longer time on the stone
Thanks for all that info guys, a couple details on my process :
I don't do the edge rabbet (Yeah Montucky, I know that's the devil :p), reason for that is I used to do it and got convex bases. I suspect the carbon strip I use in my layup is the culprit for that... anyway I get a good flatness out of the press with my carbon strip and NO rabbet for the edges.
I used not to put tape on the bases, what I use to secure them on the cassette is spray adhesive ("3M super 77 spray glue" IIRC), I had some epoxy find its way under the base (mainly on the perimeter) but nothing major expect on some skis where the tips had a tight bend radius and mold conformation was not good enough.. using small rams "ON3P style" to improve tip conformation is on the list.. but the list is long !
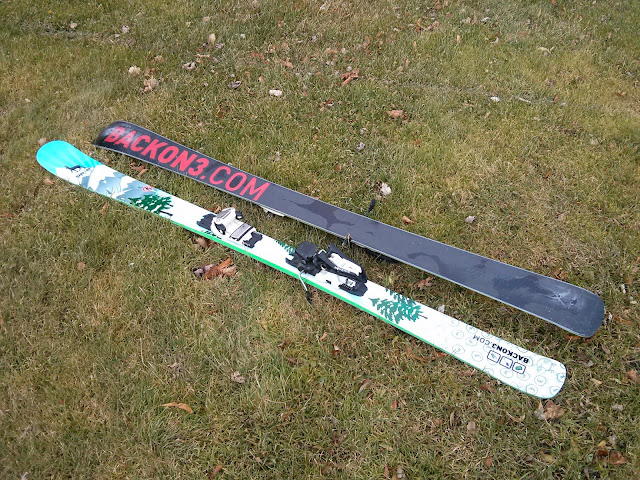
Recently I got a drag knife and I'm giving a try to die-cut bases. My first pair with die-cut bases I didn't put any packing tape under the base, the fit was tight for the die-cut so I decided I was OK without tape. The experience proved it was somehow OK but it was a PITA since the die-cut slightly extends in the tip : "pre-bent" cassette + "NOT pre-bent" edges (camber-wise) + diecut = not easy layup ! Main problem was some of the the die-cut was not staying in position.. when wetting the base with epoxy, the resin would just push the die-cut under the base, I've been able to keep everything under control but more resin than usual found its way under the base, actually in the pic below you can see epoxy found it's way almost everywhere under the base.
This pic shows the skis before I took them to the shop for a base grind.
The base grind on those skis was made in a big-bucks store like all the pairs I made in the last 2 years and the result was "average", very few base material was removed so I still had some epoxy showing here and there... as usual I would say since it looks like the guys there are not comfortable removing "so much" material (I can understand that)... the finish was not better nor worse than usual even though I felt like more epoxy had reached under the base initially.
Last pair of skis (2nd attempt to die-cut), I put some packing tape under the base so the die-cut letters would stay in place (packing tape only in the die-cut area). Layup was ways easier and very few epoxy seeped through the gaps in the die-cuts. I removed the tape straight out of the press when still slightly hot (I let the skis cool-down a bit in the press before I take them out) and it looked OK.
I still have the usual epoxy under the base near the edges (from when I wet the base + edges at the beginning of the layup), but no major pool in the die-cut area, I expected the grinding to be easier and give a better result.. I will see since those skis are still at the shop, waiting for the new belt to arrive.

As you can see, less epoxy on the base than the previous pair.
I'm really not sure I did the right choice in only applying packing tape on the die-cut area. When the tape is removed, the exposed area has no epoxy on it but it's slightly "higher" than the rest of the base.. I think if I'm to put some tape on the base to hold the die-cut tight I'm better covering the entire base+edges... the tape is very thin though, so my original thought was it would be easy to remove the "tape imprint" easily on the belt sander... I will see !
Rich -» I think I understand your point but I have a full roll of 1.2mm base material + lots of matching edge material, I have to deal with it... + lots of people here have the base thickness match their edge step and it works so the problem is very likely to come from my process
MM -» Any suggestion on how to scrape the epoxy without damaging the base before taking the skis to a shop ? Usually the epoxy that finds its way under the base gets compressed a lot in the press so it's very thin... but sticks to the base like if this side was also sanded and flame treated (well maybe not, but it sticks hard !)
I don't do the edge rabbet (Yeah Montucky, I know that's the devil :p), reason for that is I used to do it and got convex bases. I suspect the carbon strip I use in my layup is the culprit for that... anyway I get a good flatness out of the press with my carbon strip and NO rabbet for the edges.
I used not to put tape on the bases, what I use to secure them on the cassette is spray adhesive ("3M super 77 spray glue" IIRC), I had some epoxy find its way under the base (mainly on the perimeter) but nothing major expect on some skis where the tips had a tight bend radius and mold conformation was not good enough.. using small rams "ON3P style" to improve tip conformation is on the list.. but the list is long !
Recently I got a drag knife and I'm giving a try to die-cut bases. My first pair with die-cut bases I didn't put any packing tape under the base, the fit was tight for the die-cut so I decided I was OK without tape. The experience proved it was somehow OK but it was a PITA since the die-cut slightly extends in the tip : "pre-bent" cassette + "NOT pre-bent" edges (camber-wise) + diecut = not easy layup ! Main problem was some of the the die-cut was not staying in position.. when wetting the base with epoxy, the resin would just push the die-cut under the base, I've been able to keep everything under control but more resin than usual found its way under the base, actually in the pic below you can see epoxy found it's way almost everywhere under the base.
This pic shows the skis before I took them to the shop for a base grind.
The base grind on those skis was made in a big-bucks store like all the pairs I made in the last 2 years and the result was "average", very few base material was removed so I still had some epoxy showing here and there... as usual I would say since it looks like the guys there are not comfortable removing "so much" material (I can understand that)... the finish was not better nor worse than usual even though I felt like more epoxy had reached under the base initially.
Last pair of skis (2nd attempt to die-cut), I put some packing tape under the base so the die-cut letters would stay in place (packing tape only in the die-cut area). Layup was ways easier and very few epoxy seeped through the gaps in the die-cuts. I removed the tape straight out of the press when still slightly hot (I let the skis cool-down a bit in the press before I take them out) and it looked OK.
I still have the usual epoxy under the base near the edges (from when I wet the base + edges at the beginning of the layup), but no major pool in the die-cut area, I expected the grinding to be easier and give a better result.. I will see since those skis are still at the shop, waiting for the new belt to arrive.
As you can see, less epoxy on the base than the previous pair.
I'm really not sure I did the right choice in only applying packing tape on the die-cut area. When the tape is removed, the exposed area has no epoxy on it but it's slightly "higher" than the rest of the base.. I think if I'm to put some tape on the base to hold the die-cut tight I'm better covering the entire base+edges... the tape is very thin though, so my original thought was it would be easy to remove the "tape imprint" easily on the belt sander... I will see !
Rich -» I think I understand your point but I have a full roll of 1.2mm base material + lots of matching edge material, I have to deal with it... + lots of people here have the base thickness match their edge step and it works so the problem is very likely to come from my process
MM -» Any suggestion on how to scrape the epoxy without damaging the base before taking the skis to a shop ? Usually the epoxy that finds its way under the base gets compressed a lot in the press so it's very thin... but sticks to the base like if this side was also sanded and flame treated (well maybe not, but it sticks hard !)
A bad day skiing is always better than a good one at work...
-
knightsofnii
- Posts: 1148
- Joined: Tue Jan 08, 2008 6:02 am
- Location: NJ USA
- Contact:
those spots in the center area of the ski look like pretty thick epoxy puddles, my guess is its a possibility the base bubbled up there a pinch and you're going to have trouble grinding that out.
But it's hard to tell from a photo.
We've ground epoxy covered bases thru our snb350 with a lightly "broken" (run breaking stone over belt for a couple seconds) 100 grit as the first belt. It removes most all the epoxy within 5-6 passes. I dont remember what pressure we have it set at.
this is a 25-30 yr old autofeed grinder that many shops still use.
Usually if anything is left behind after that, it's too deep. We have 80 grits but use them sparingly.
Doug
interesting.. what do you mean by "the base bubbled up"
On the 2nd pic you can see 3 things : the tape indention where the die-cut is (slightly visible), some epoxy puddles, and the spray adhesive residue (more obvious on the tip opposite the die-cut on the "bottom" ski, but larger on the "top" ski)
On the 2nd pic you can see 3 things : the tape indention where the die-cut is (slightly visible), some epoxy puddles, and the spray adhesive residue (more obvious on the tip opposite the die-cut on the "bottom" ski, but larger on the "top" ski)
A bad day skiing is always better than a good one at work...
Sand first with 80 grit. next 100 then 120. Off to the grinder for the final passes. All belts are broken in first. Use caution and light feed pressure with the 80 grit as it removes material quick. 3/4 wrap skis need additional caution while sanding. I usually start and stop before the ends of the skis and then follow up by hand finishing the tips and tails over the sander.
I have not done the die cuts but won't the spray adhesive hold them in place? I would try to avoid the use of tape as it presses into the base or is it, presses the base into the glass? either way....
RA
I have not done the die cuts but won't the spray adhesive hold them in place? I would try to avoid the use of tape as it presses into the base or is it, presses the base into the glass? either way....
RA
Unfortunately the spray adhesive won't keep the base together, at least with the setup I have (non-flat casette w/ "flat" materials). With the die-cut where it is, if I pre-bend the base+edges, the die-cut letters are falling, I could manage to keep them in place enough during layup with medipore tape but then I would have quite large gaps for the epoxy to seep under the base.
For my next pair, I will try with packing tape on all the base surface (so it's even, no risk of tape pressing into the base), and actually the tape will overhang all around the edges so when I "wet" my base+edges at the begining of the layup, it creates a "dam" so the resin doesn't try to flow under the base... I'll report on that.
+ I'm trying to decide on the details of a ram system in order to push the cassette against the mold in the tips before inflating the bladder (ON3P style) for better tip compliance. Richuck gave me some nice ideas for that, I just have to make it happen !
.. but for now I put the ski building on hold, I'm focussed on preparing my trip to BC at the end of the month :p
A bad day skiing is always better than a good one at work...