
Just a placeholder at the moment. I will try a lot of new things in this ski:
- Real ski ends like in commercial skis
- hollow tip
- a mix of sidewall and cap
- and perhaps even a titanal layer
Well, after drawing the plan for the core etc, it reminded me a lot of a puzzle. Hence the name. Will slowly collect & produce the puzzle parts, you will like it ;)
Regards
Philipp
Puzzle Skis
Moderators: Head Monkey, kelvin, bigKam, skidesmond, chrismp
So,
whenever I want to do something new when building, I draw. Makes thinking and planning easier as it shows mistakes. After some rough drawings, I end up with something like this:
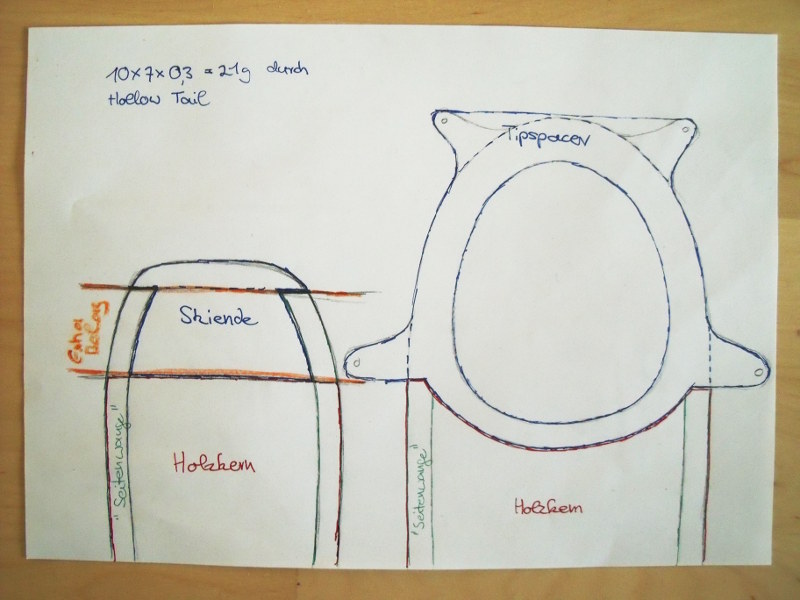
the first pic shows my plan of making a cap construction, the second one my plans for tip & tail.
To answer the question "Why cap"?:
I played around with poured sidewalls a bit. Without a pressure chamber the results will never be perfect. As I want my skis to be as perfect as possible, I would have to build a pressure box. And I don't have the tools, time and place for storing.
Working with normal sidewalls seems to be difficult as well - they rib off in the planer, have to be flamed for proper bonding, the planer chips are just waste ... ... ...
So, making perfect sidewalls also is not easy.
But the real reason is weight: I want to build skis that can be used well for touring, and weight is an important factor. Calculating a bit shows that a 8mm wide sidewall makes a single ski more than 100g heavier (compared to just wood).
So I will go for a cap construction again - I also really like the look of it.
One problem with stock cap skis is that the power transmission is said to be inferior compared to sidewall skis. That's why I made the first drawing. With the top layer of triax carbon integrated in the cap, I doubt the power transmission will be inferior.
Cheers
whenever I want to do something new when building, I draw. Makes thinking and planning easier as it shows mistakes. After some rough drawings, I end up with something like this:
the first pic shows my plan of making a cap construction, the second one my plans for tip & tail.
To answer the question "Why cap"?:
I played around with poured sidewalls a bit. Without a pressure chamber the results will never be perfect. As I want my skis to be as perfect as possible, I would have to build a pressure box. And I don't have the tools, time and place for storing.
Working with normal sidewalls seems to be difficult as well - they rib off in the planer, have to be flamed for proper bonding, the planer chips are just waste ... ... ...
So, making perfect sidewalls also is not easy.
But the real reason is weight: I want to build skis that can be used well for touring, and weight is an important factor. Calculating a bit shows that a 8mm wide sidewall makes a single ski more than 100g heavier (compared to just wood).
So I will go for a cap construction again - I also really like the look of it.
One problem with stock cap skis is that the power transmission is said to be inferior compared to sidewall skis. That's why I made the first drawing. With the top layer of triax carbon integrated in the cap, I doubt the power transmission will be inferior.
Cheers
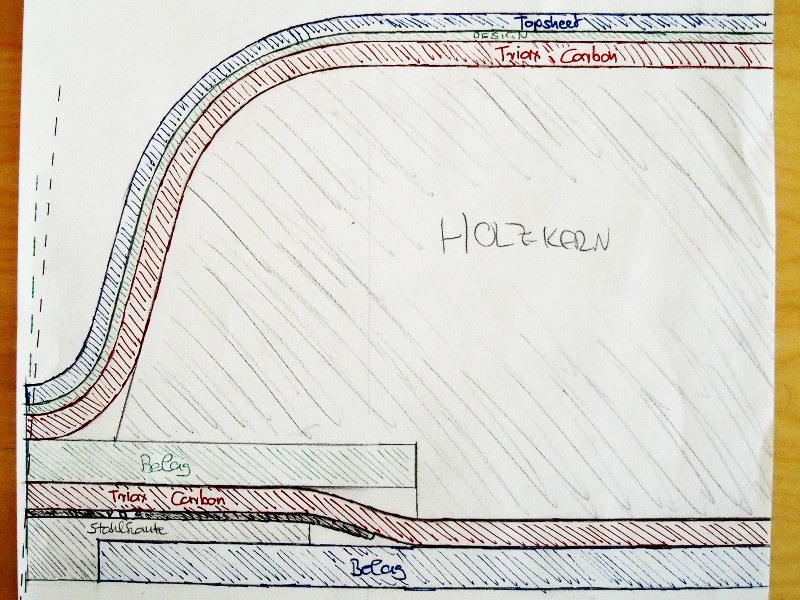
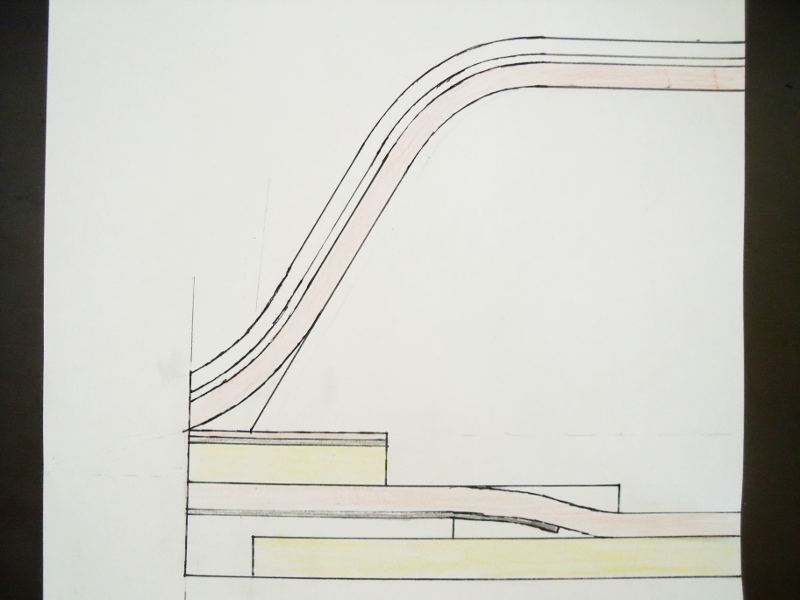
And as it is when planning something new: Even after the planning is done I keep on thinking about it... and in this case, had a good thought:
As you can see, I add a layer of base above the edge. Why? well, I will press the ski in 2 steps. First everything below the woodcore including the woodcore, then route the sides for the cap, and then press the cap layers. the base material is mostly there that I can rout away all the wood without taking away any of the lower triax carbon.
But: If I rout away a bit of the base layer, I might have bonding problems when pressing the cap. Or I would have to flame that base layer again and ... just not a nice solution. So, I need something where I can rout in to without compromising the bonding of the cap press. So I will just add a layer of fiberglass (it can be bought as a "ribbon", so hardly any extra work).
And, as I call the skis "puzzle skis", lets add another layer - some VDS below the fiberglass ribbon. Some say it helps dampening the ski, some say its just for bonding. I like puzzling, if it helps, perfect, if not no harm done.
Ski Aufbau
Hallo Phillip,
habe gerade deinen Ski Aufbau gesehen sehr interresant.
Mich würde interrrsieren was der zweite Belag oberhalb der Kante macht.
Hast du so eine Bauweise schon getestet?
Schöne Grüsse aus Reutte
Wolfgang
feso-technik@gmx.at
habe gerade deinen Ski Aufbau gesehen sehr interresant.
Mich würde interrrsieren was der zweite Belag oberhalb der Kante macht.
Hast du so eine Bauweise schon getestet?
Schöne Grüsse aus Reutte
Wolfgang
feso-technik@gmx.at

Why do it in 2 steps?
If you route the core before layup and have good core alignment eg. Inserts glued to base with corresponding holes in core, you should do it all with one step and much less hassle.
I don't think i would put that extra layer of base in there as you say.
If you route the core before layup and have good core alignment eg. Inserts glued to base with corresponding holes in core, you should do it all with one step and much less hassle.
I don't think i would put that extra layer of base in there as you say.
Don't wait up, I'm off to kill Summer....
Will answer in english, hope you understand it Wolfgang.
The 2 steps and the extra bit of base are connected:
Regarding 1 step, I cannot think of an alignment method for layup that will guarantee no core shift. If the core moves only like 0,2mm, it will already be visible in the finished product - uneven cap (left and right side) will then be visible.
And the layup will be quite hard, the lower carbon layer will interfere with whatever alignment method I choose, perhaps making the cap imperfect.
I would also have to route the woodcore extremely precise before layup, and if the wood moves a bit then the result again is imperfect.
To summarize: Many "maybe it will work, but XXX could happen".
So my idea is to make everything easier. My plan is not to produce skis as time efficient as possible, but aiming for an as perfect as possible result. And having an nice build without stress - its a hobby after all.
So the idea is:
1) Press base, edges, VDS, lower triax and wood core
2) trim excess wood
3) Press top parts as cap.
The only real problem I came up with when thinking about this is step 2): How can I rout away exactly all the wood but none of the VDS or lower triax (as this would surely be bad for the rideability). Answer: I can not. With my equipment, there will remain a tolerance of about 0,1 - 0,2mm.
So my first idea was: just put an extra layer of base where you rout, it does not hurt if 0.1mm of this is routed away. But I did not think of bonding issues the routed base might have.
So, lets put some more there: An extra layer of VDS which might dampen and a thin layer of glass where I can rout in.
I also think the extra part of base will be good for power transmission and add just a little bit of breaking resistance when hitting rocks etc. Lets see.
Just became a father 2 days ago, so it will be quite some time till I build these skis :)
-
MadRussian
- Posts: 712
- Joined: Thu Sep 30, 2010 12:32 pm
- Location: USA
when you talking weight.... how light do you want to make to skis?
why not to make wood sidewall? I think it reasonable to expect big wide skis 110--120 under foot 185--190 in length be around 1800 to 2000g probably less if more carbon fiber and less fiberglass
from brief look process you describing sounds complicated. IMO too much effort for little results
why not to make wood sidewall? I think it reasonable to expect big wide skis 110--120 under foot 185--190 in length be around 1800 to 2000g probably less if more carbon fiber and less fiberglass
from brief look process you describing sounds complicated. IMO too much effort for little results
I have not failed. I've just found 10,000 ways that won't work.
Thomas A. Edison
Thomas A. Edison
@mr:
Its not just about weight, its the way I want my skis to be. I want them to be leightweight yet "aggressive" (don't dare to give me some skis that are very soft and damp), durable and good looking from a craft POV. Time is not a matter to me at the moment. I have to admit I like the look of this complicated puzzle setup :)
With wooden sidewalls, I have doubts about the durability (I take good care of my skis, wax and sharpen them often) - some water will get into the sidewall and maybe shorten the skis life. Putting oil or wax on the sidewall regularly will surely help a lot I admit. If I find my process too difficult I will give wooden sidewalls a try.
And cap looks very good to me, built 1 cap and I like the look more than the sidewall look. Durability is an issue, but with a topsheet, the design and the triax as cap it should hold off quite a bit of misuse.
And last but not least, I have never seen a layup like this before - lets go for something new :)
-
MadRussian
- Posts: 712
- Joined: Thu Sep 30, 2010 12:32 pm
- Location: USA
out of curiosity, because you didn't give any specifics, I wonder what weight and ski dimensions you have in mind.
Depends what wood to be use for sidewall additional treatment is not necessary IPE, black Locust, mahogany to name a few will last very long time without any treatment. I have ipe sidewall full season without any treatment.
When I said about effort and results.... it's not only time to do it. I mean an overall time, effort and cost to create process to do what you want ..... To save 100g? IMO before going complicated route try to do something simpler for example 3x carbon fiber with thinner core and use more hardwood or harder hardwood
iirc one of the volkl models last year full carbon top where it drops down about 1/2" from the edge very is similar to what you trying to do
Depends what wood to be use for sidewall additional treatment is not necessary IPE, black Locust, mahogany to name a few will last very long time without any treatment. I have ipe sidewall full season without any treatment.
When I said about effort and results.... it's not only time to do it. I mean an overall time, effort and cost to create process to do what you want ..... To save 100g? IMO before going complicated route try to do something simpler for example 3x carbon fiber with thinner core and use more hardwood or harder hardwood
I think I have.And last but not least, I have never seen a layup like this before
iirc one of the volkl models last year full carbon top where it drops down about 1/2" from the edge very is similar to what you trying to do
I have not failed. I've just found 10,000 ways that won't work.
Thomas A. Edison
Thomas A. Edison
Hi MR,
I am not trying to go superlight, but a good mix of rideability and weight. But Rideability is the Nr. 1 priority. What I will do for having the skis light but still well performing
Regarding the whole process, I doubt it will take so much extra time. Compared to a wooden sidewall it will of course, but not too much I think. I will have more than one pressing process thats true, but they will be shorter than a whole layup.
The work in between (routing the wood core sides and a bit of sanding won't take so long, as I have a router bit doing exactly what (A modified "Zinkenfräser" - cannot find the proper translation).
All the other work (cutting excess material away and so on) I would have to do anyway.
So the only thing really adding extra work time is the second press process. Compared to the sidewall pouring effort I did in my last skis, it will be less total work.
Ah to answer your first question, the model I will build first is a All-mountain/touring ski. Dimensions are 126-86-112, 176 long. If my calculations are correct, I will end up with about 1300g per ski.
I am currently building 2 pairs of the same ski with poured PU sidewalls. Like this I will have a nice comparison regarding weight, rideability and so on. And perhaps most interesting, comparing the edge hold. Its always said that cap skis are performing much worse here.
So, time too look after my little daughter, we are still in hospital. In 3 years I will start building very light skis - because they will be about 70cm long :)
[/list]
I am not trying to go superlight, but a good mix of rideability and weight. But Rideability is the Nr. 1 priority. What I will do for having the skis light but still well performing
- No superlight woods, but poplar for the inner part of the core, and 2 ash stringers along the sidecut.
- carbon (450g/m² triax) instead of glass fibre - also because I like the pop of carbon. combined with the damp ash its a good mix for me.
- And as a gimmick, the skis will have a hollow tip (just some tipspacer material removal, no real hollow tip where you can see trough). Will save about 20g per ski :)
Regarding the whole process, I doubt it will take so much extra time. Compared to a wooden sidewall it will of course, but not too much I think. I will have more than one pressing process thats true, but they will be shorter than a whole layup.
The work in between (routing the wood core sides and a bit of sanding won't take so long, as I have a router bit doing exactly what (A modified "Zinkenfräser" - cannot find the proper translation).
All the other work (cutting excess material away and so on) I would have to do anyway.
So the only thing really adding extra work time is the second press process. Compared to the sidewall pouring effort I did in my last skis, it will be less total work.
Ah to answer your first question, the model I will build first is a All-mountain/touring ski. Dimensions are 126-86-112, 176 long. If my calculations are correct, I will end up with about 1300g per ski.
I am currently building 2 pairs of the same ski with poured PU sidewalls. Like this I will have a nice comparison regarding weight, rideability and so on. And perhaps most interesting, comparing the edge hold. Its always said that cap skis are performing much worse here.
So, time too look after my little daughter, we are still in hospital. In 3 years I will start building very light skis - because they will be about 70cm long :)
[/list]
-
MadRussian
- Posts: 712
- Joined: Thu Sep 30, 2010 12:32 pm
- Location: USA
1300g very light in that size. I used in similar sized skis a lot of black Locust and ski came out 1800 g each. imo if every gram counts ash is relatively heavy compared to Maple or Birch. I would suggest look into find some yellow birch to replace ash and bamboo for sidewall
I have not failed. I've just found 10,000 ways that won't work.
Thomas A. Edison
Thomas A. Edison
You like testing different woods I see :)
I am completely satisfied how the poplar/ash/pure carbon combination rides. The skis are lively (what I really like) but not nervous. Plus I can get poplar and ash in top condition easily for a good price. So definitely no wood-hunting from my side, but trying a construction like this instead.
And you are right, 1300g would be really light, I actually meant something in between 1300g and 1400g. If its more I don't mind as long as I like riding that ski.
-
MadRussian
- Posts: 712
- Joined: Thu Sep 30, 2010 12:32 pm
- Location: USA
Since you already predetermined on direction you taken this discussion is pointless.
Yes I like to use different woods to achieve specific results. I didn't need to experiment. When time comes to build hardcharging stiff skis in 1500g range I know exactly how it will be done.
Couple thanks. In light skis I wouldn't be using ash and no wood hunting for me. All ski building woods easy to find around here
good luck
I have not failed. I've just found 10,000 ways that won't work.
Thomas A. Edison
Thomas A. Edison
Getting wood here is not soooo easy... I would have to find dealers that have the woods I am looking for, in a dry state, and in sizes I can work with. Poplar and Ash are available from skibaumarkt.de in 25mm wide stripes at a humidity of 6-8%, so ready to be glued together to cores.
Should the time come when I can play easily with all other parameters that affect the final ski (yes, this will take a lot of builds more, and when I look over to my 5 days old daughter something tells me that my time will be more limited now) I might give other woods a try - paulownia and bamboo sound pretty interesting to me.
So for now my playgrounds are the way I construct skis (hence this journal to log this puzzle layup), core thickness profile in combination with rockers (my tips are relatively stiff so the skis carve nicely when pressed hard), and the transitions from the sidecut to the tip/tail - and some other ideas I have in mind. I could have a whole year of 8 hours of skibuilding a day and still wouldn't have done everything I have in mind. So I have to organize my ideas (as probably everyone here).
Sloooow progress...
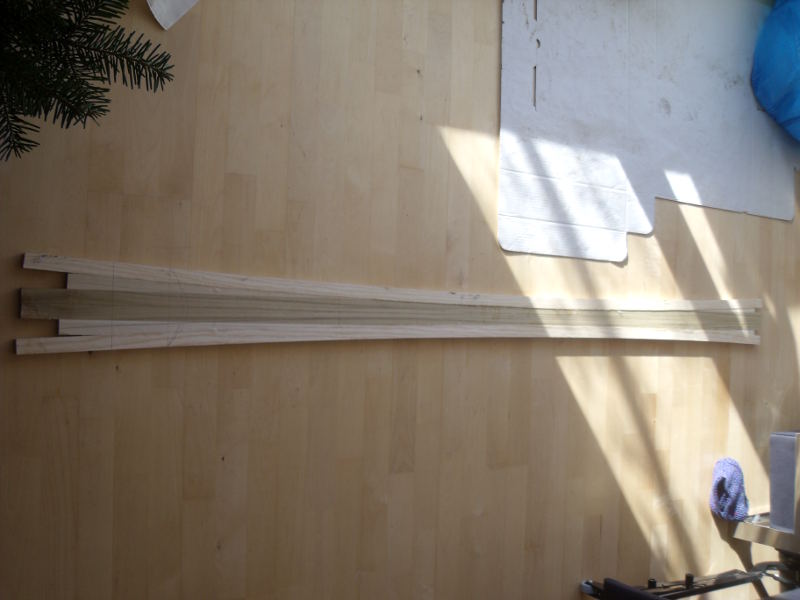
Wood cores are glued together. Poplar on the inside, the 2 outer stringers are ash:
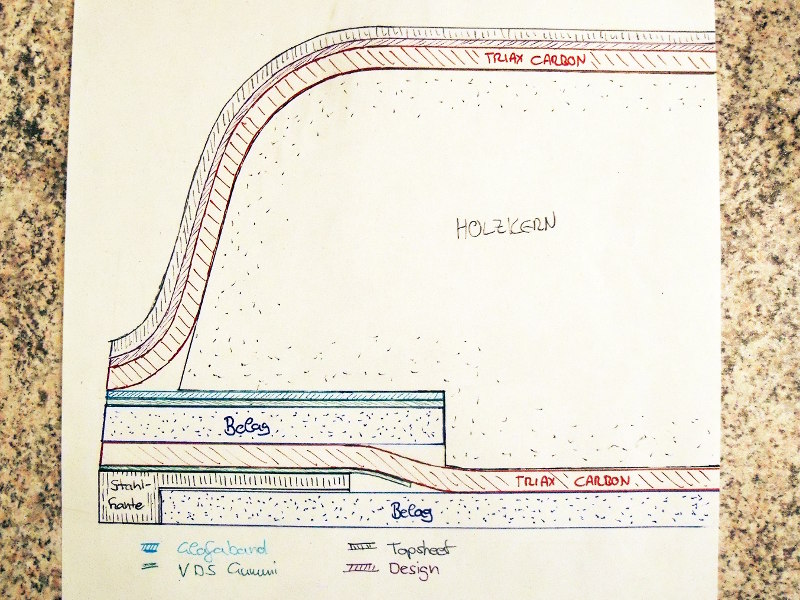
And after testing a bit with the topsheet, carbon etc, I made a more realistic drawing of what it will look like. Will use a 30° angle now, so in case the top sheet etc. does not bend into shape as much as I want, the edges can still be tuned well.
Tomorrow I will try to finish the woodcores, prepare all the stuff for layup (base and edges are finished already), and then start pressing after christmas.
Cheers
Wood cores are glued together. Poplar on the inside, the 2 outer stringers are ash:
And after testing a bit with the topsheet, carbon etc, I made a more realistic drawing of what it will look like. Will use a 30° angle now, so in case the top sheet etc. does not bend into shape as much as I want, the edges can still be tuned well.
Tomorrow I will try to finish the woodcores, prepare all the stuff for layup (base and edges are finished already), and then start pressing after christmas.
Cheers