Page 1 of 15
HB (Hansen Boards)
Posted: Sun Oct 11, 2015 5:31 am
by Akiwi
We have been using HB for building longboards for the last year, so I guess we can keep it for skis and snowboards.
As the summer sports season has finished at last, I don't have to spend my weekends driving kids around to various smorts activities, so at last I have some time to get into the celler workshop (Manhole) and start on my new project to build some skis / snowboards befor the winter..
That is the plan anyway.
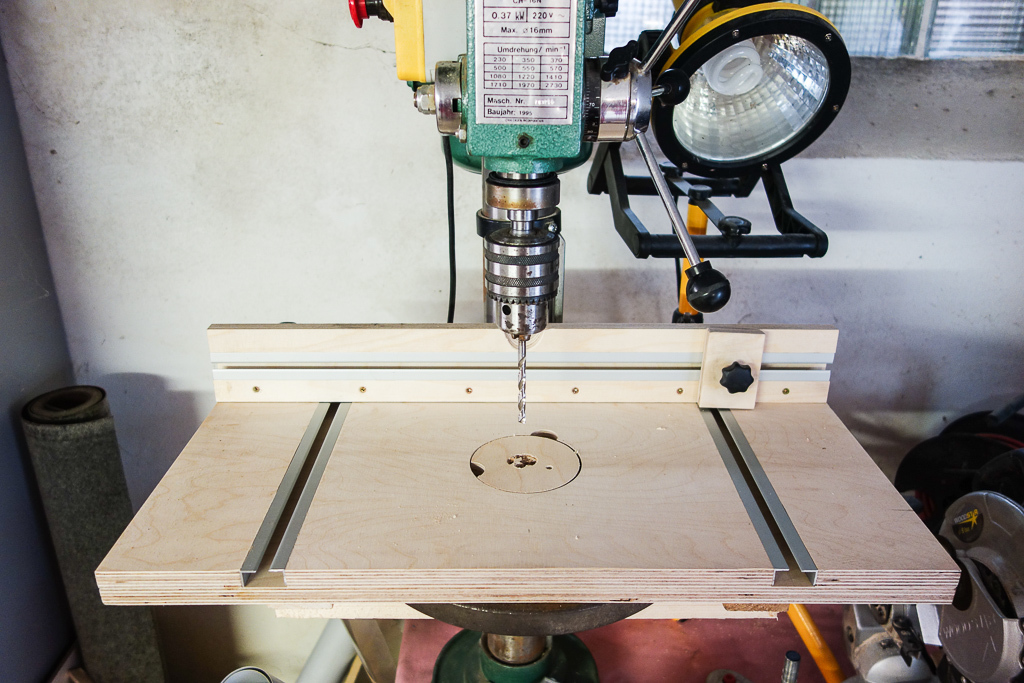
My first job is to build a Profilinf table.
But before I could do that I built a table with adjustable gate for my drill Press.
So building tools to help me build tools.
Thisw is something I have been needing for ages. I made an adjustable gate with a rail where a block can be tightenend to help with positioning when multiple holes are needed in the same place.
Also a replaceable puck in the middle where you can drill into.

Posted: Sun Oct 11, 2015 5:46 am
by Akiwi
That was my Thursday Friday evening project.
Now I have started on my profile table.
I will use the router bridge technique, as I have a router, and don*t have a Planer.
I have decided to build an adjustable vacuum router bridge for snowboards and skis.
My first job is to build mark out, and drill all the holes for the vacuum
My 22mm MDF board is 40 cm wide, 200 cm long.
I hsed my drill press for drilling holes in the long axis.
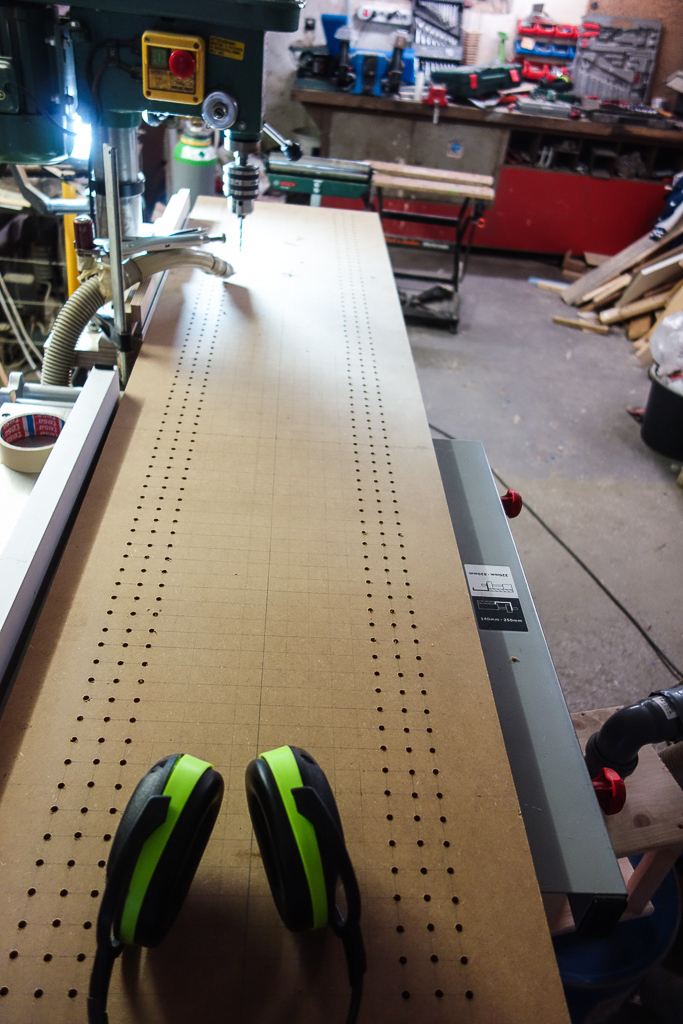
Vacuum cleaner is set up to remove dust immediately.
As I got further in, my gate turned out to be too thick So I went as far as possible using the Drill press.

The middle 3 rows I had to drill with the cordless drill, SO I decided to leave the middle without holes.
I drilled 1380 holes. My friends think I am mad. I am starting to think so too.

Lastly I flipped the board and cleaned up the holes ion the inside.

Now on to make the vacuum box.
Posted: Sun Oct 11, 2015 11:25 pm
by chrismp
So glad I have a cnc to drill all those holes

Posted: Sun Oct 11, 2015 11:33 pm
by Akiwi
chrismp wrote:So glad I have a cnc to drill all those holes
My Arm would agree with you.
My wallet (and wife) wouldn't.
A CNC would make a lot of things easier. But it is not in my short term plans.. or budget.
Posted: Fri Oct 16, 2015 3:36 am
by knightsofnii
Akiwi wrote:chrismp wrote:So glad I have a cnc to drill all those holes
My Arm would agree with you.
My wallet (and wife) wouldn't.
A CNC would make a lot of things easier. But it is not in my short term plans.. or budget.
same here. I did this on the CNC.
However, I still had to go back with a drill and dress up each hole, my arms were super sore, it took a couple nights.
Posted: Fri Oct 16, 2015 10:11 am
by Akiwi
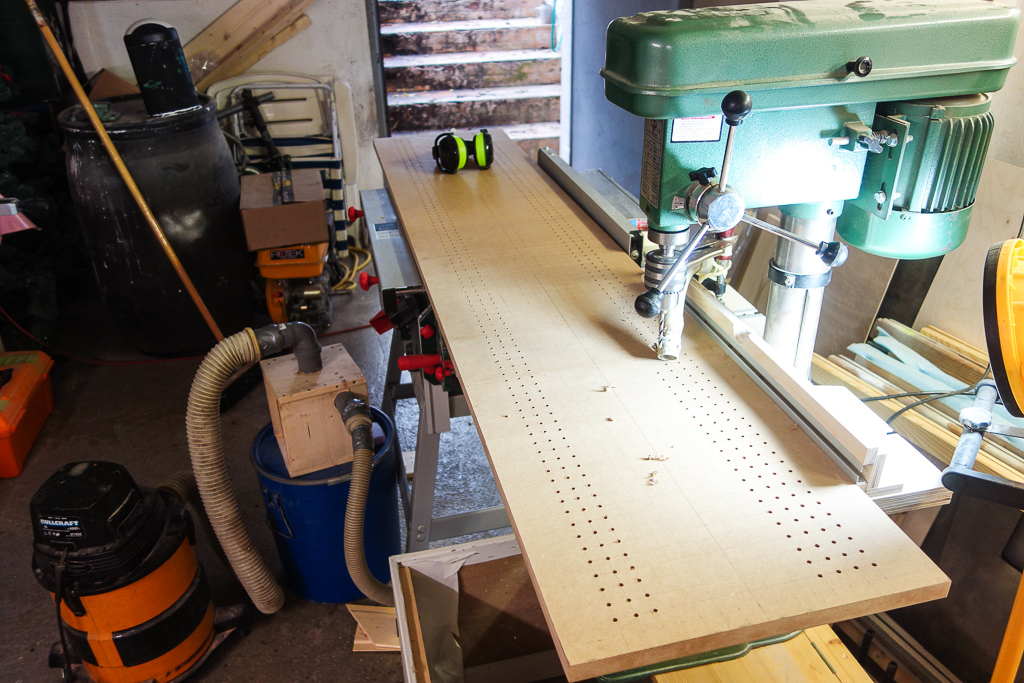
Ok, Table is nearly finished.
I tested it and it holds quite well. Maybe I need a little more powerfull vacuum

Posted: Fri Oct 16, 2015 10:47 am
by Hannes
Nice railsystem. If it works I might copy it.
Posted: Fri Oct 16, 2015 7:28 pm
by MadRussian
hope this rail system will work for you. Unfortunately it didn't work for me. Wonder what kind router bridge you built.
Also I don't think MDF good choice for material to make vacuum table.
I tried holes 1" apart like you at first and didn't find table create enough suction.... had to triple amount of holes
Posted: Fri Oct 16, 2015 8:18 pm
by falls
It might help to seal the MDF top and sides with paint or varnish to direct as much vacuum through the holes as possible. MDF is porous.
Also I think I would go to the extra trouble of drilling out the holes in the middle. After all that's where your material actually is and it's the holes under the core that actually hold it down.
Looks like a great effort so far.
Posted: Sat Oct 17, 2015 12:38 am
by Akiwi
Good tips.
I sealed the inside of the vacuum box by mixing wood glue and water and painting that over the MDF. I will do the same on the top and sides.
I'm off to get some Plywood to do a test run.
I'll let you know.
Posted: Sat Oct 17, 2015 7:47 am
by Akiwi
Very happy with the results. It worked perfectly.
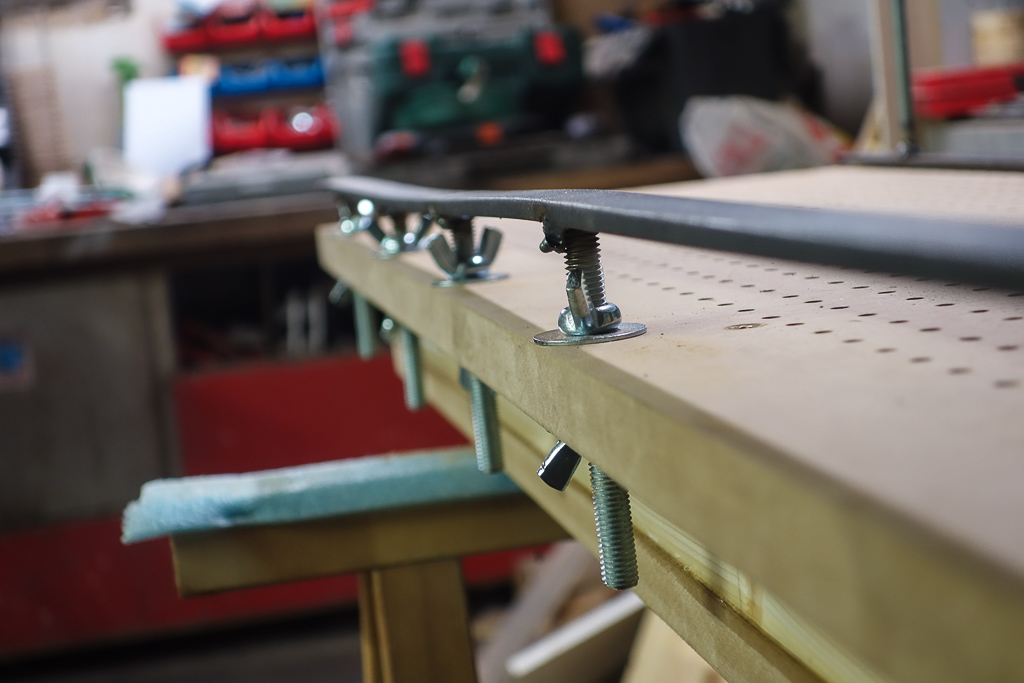
Here you can see detail of the bridge I built. I added angle iron to make it good and stiff yo I wouldn't get any sag.
I also taped up the exposed holes.
The board was held so tight I could lift the whole table with it. Great success.
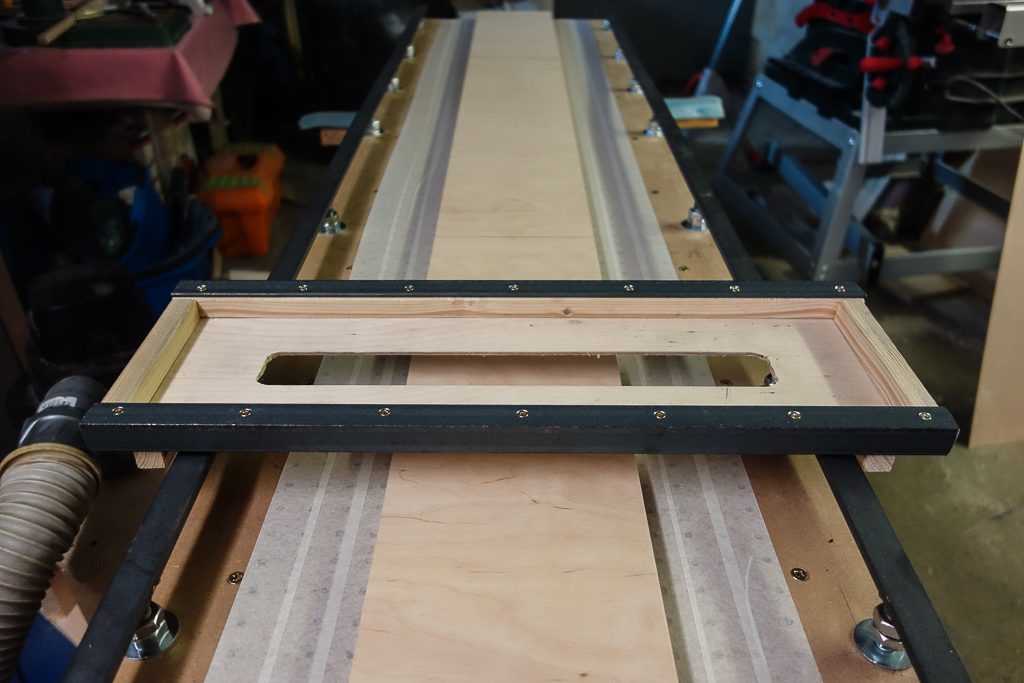
I decided to use a double layer of nuts instead of wingnuts on the top, as you can lock them together better. I figured the wingnuts could turn by themselves because of the vibrations. Using a spanner and wingnut on the bottom it was pretty easy to adjust the rails to 1mm or finer.

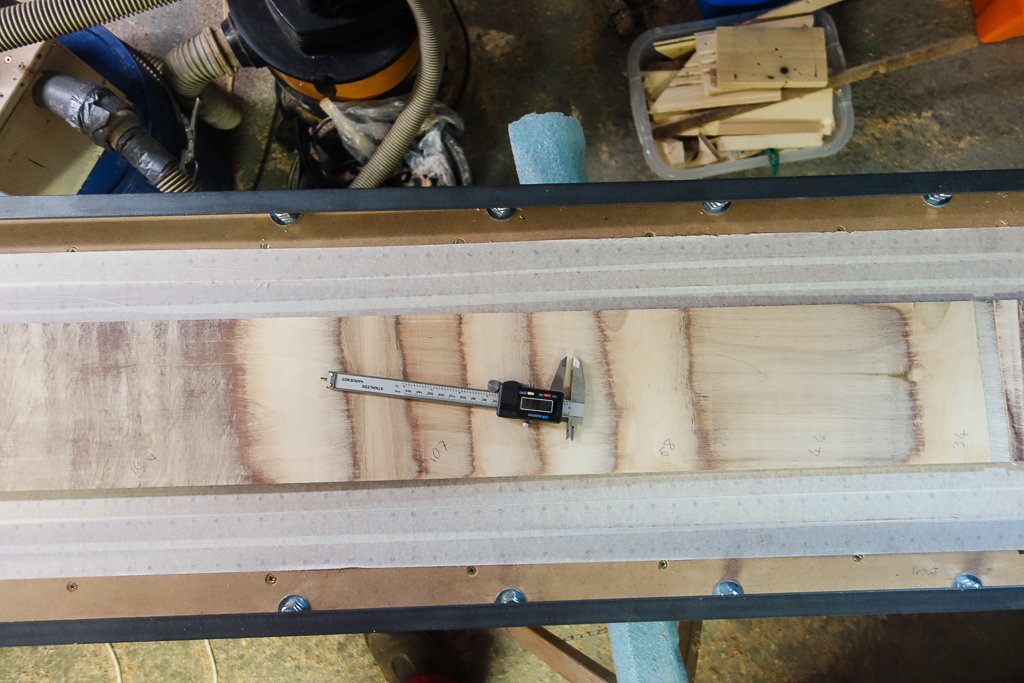
The first core I made worked well. Maybe the flat bit on the tip which should be straight at 3mm for 20 cm wasn't perfect.. I can fix that with the sander, and tune it for next time..

I need to work something out to reduce the amount of dust.. My workshop looks like a bomb went off.
Posted: Sat Oct 17, 2015 10:28 am
by Akiwi
Damn!!!
I was doing my second core, and obviously something came loose on my router and it sank a bit, cutting the core right through. At about 30 cm from the tip. Grrrrr!!
I probably do need a new router. that one in the photo I have had for about 30 years. It is good, but not very powerfull, and difficult to adjust / lock etc.
Posted: Thu Oct 22, 2015 2:36 pm
by Akiwi
The last couple of nights I have been experimenting in my celler making an edge bender. I think I have it working now. Tested on a short piece and can bend it how I want. Tight enough for skis.

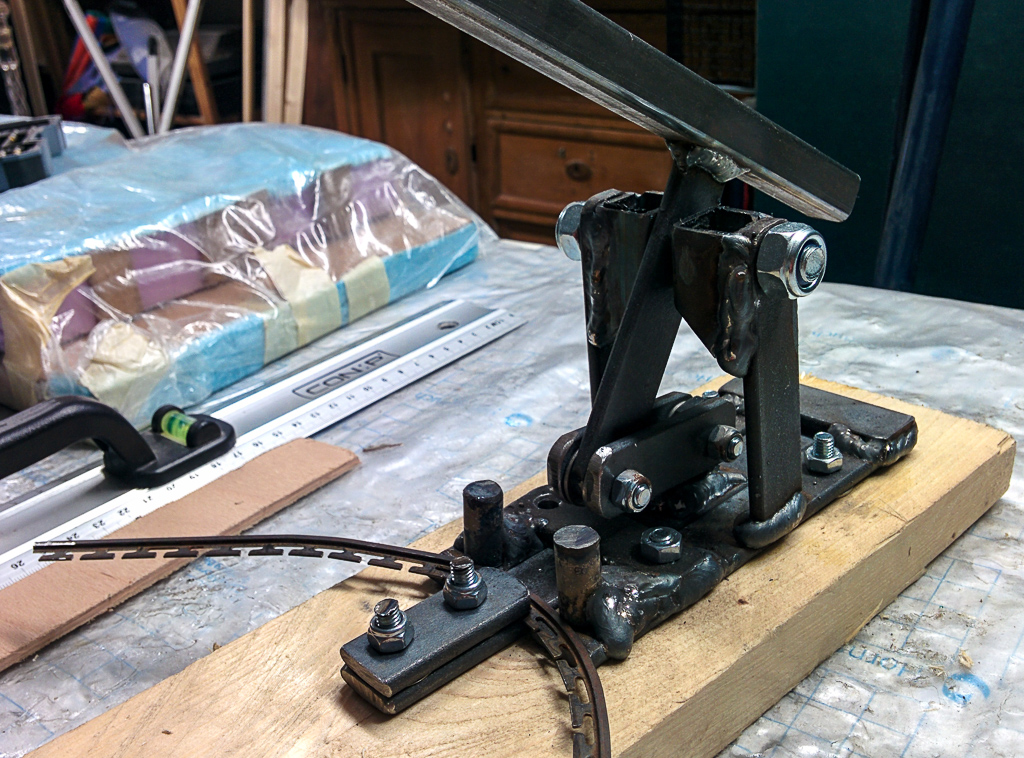
It is mainly made of 20 x 4mm steel. Then at the top is bit of 20 x 20 to hold the arm centered.
I'll practice a bit with it and if I am satisfied with the results I'll do a video.
No comments on my welding. I bought a welder last year and taught myself.
Posted: Fri Oct 23, 2015 12:03 am
by chrismp
Looks good! I guess you had inspiration from the bender Apex are using?
The modified tile nippers which are very common on this forum are a great addition to any bender for fine adjustments btw. Plus they cost next to nothing and are easy to make.
Posted: Fri Oct 23, 2015 12:25 am
by Akiwi
chrismp wrote:Looks good! I guess you had inspiration from the bender Apex are using?
The modified tile nippers which are very common on this forum are a great addition to any bender for fine adjustments btw. Plus they cost next to nothing and are easy to make.
Yes, I saw the Apex thing and flipped the direction, as their one the machine would be in the way for tight curves.
I was at Hagebaumarkt yesterday and wasn't sure what to buy. The tile snippers looked so small, so I was thinking the Nail pullers might be better.
Opinions?
What would be better.
A Kantenzange like this:
http://www.obi.de/decom/product/LUX_Kan ... ageSize=24
Or a Rabitzzange like this:
http://www.obi.de/decom/product/LUX_Rab ... ic/5255997


