
DIY Silicone Heat Blanket
Moderators: Head Monkey, kelvin, bigKam, skidesmond, chrismp
or is he trying to dry the wood before lamination using his heaters?
Fighting gravity on a daily basis
www.Whiteroomcustomskis.com
www.Whiteroomcustomskis.com


Yes.  That's just silly. Resaw? Yes. Blocks? Yes. Laminating press? No. Heating the press and using epoxy? Not 100% sure but it certainly begs the question: WHY? The wood already breaks out LONG before the glue, ANY glue but library paste, gives way and a press thins the glue (any glue) to a ridiculous, non-binding layer that will only adhere properly if the joining sucks... Did I miss something?
"86% of the time it works 100% of the time".

Yes you've lost a lotBrazen wrote:Yes.
Lol ... Endre, you're not pre-bending your cores with this high heat, tell me it isn't soooo ; )Brazen wrote:
Yes. That's just silly. Resaw? Yes. Blocks? Yes. Laminating press? No. Heating the press and using epoxy? Not 100% sure but it certainly begs the question: WHY? The wood already breaks out LONG before the glue, ANY glue but library paste, gives way and a press thins the glue (any glue) to a ridiculous, non-binding layer that will only adhere properly if the joining sucks... Did I miss something?
Yes you've lost a lot
-
MontuckyMadman

- Posts: 2395
- Joined: Fri Jun 20, 2008 9:41 pm
This is what I was referring to. If pressing thinned the epoxy to a nonbinding layer why would anyone press a ski?falls wrote:Using a laminating press to stack boards and glue them together then resaw on the bandsaw and bookmatch if you want is a pretty good way to make a core.
Brazen why so argumentative?
You could make a core block that would make 5 pair in half the time or less as a conventional glue up.
Pretty sure signal does this as well for boards.
I use a poly glue, and it says right on it not to clamp TOO tightly and I don't know about your press, but mine would be too tightly for core blocks, to say nothing of the pulling out of molds, etc. And I'm a pill when I drink (glug glug). Happy New Year, hope I didn't ruffle anyone's feathers too badly and if I did, hey, free angst!
"86% of the time it works 100% of the time".
Folsom Customs Core Shop
You can see the pneumatic core press in the top of photo
Core block of planks glued together on te bandsaw for resawing and a core that has been sawn off being planed through the planer in the forground.
Sounds like Brazen's glue might not be the correct type for pressing too hard with, but other glues and epoxy are OK fro this process
(Brazen name suits you perhaps)

You can see the pneumatic core press in the top of photo
Core block of planks glued together on te bandsaw for resawing and a core that has been sawn off being planed through the planer in the forground.
Sounds like Brazen's glue might not be the correct type for pressing too hard with, but other glues and epoxy are OK fro this process
(Brazen name suits you perhaps
Don't wait up, I'm off to kill Summer....

-
jvangelder
- Posts: 181
- Joined: Tue Jul 07, 2009 4:41 pm
- Location: Southern NH
second try and we finally have a heat blanket we're happy with.
ironed out the heat build-up issues where the resistance wires meet the lead wire by placing the resistance wires further apart from each other.
unfortunately most of the photos we took were lost in a computer crash, so I'll try to describe what we did in a little walkthrough.
1. we cut two fibreglass mats a little bigger than the heated area we planned for. we used some 300g/m² biax that we had lying around.
2. we drew some guide lines on one of the mats so we could place the resistance wire more easily.

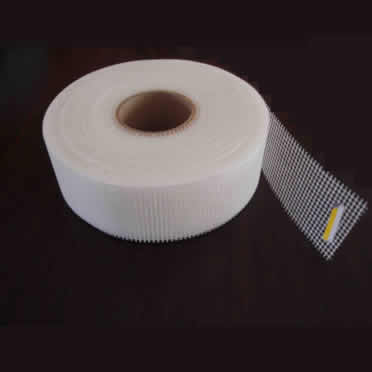
3. we applied the resistance wire to the mat using fiberglass drywall joint tape to hold it in place. we use five lengths of resistance wire connected in parallel.
here's the tape i'm talking about (can be found in any hardware store):
4. then we placed the blank lead wire on the mat. again holding it in place with some drywall tape. the insulated part of the lead wire that exits the blanket is attached to the fiberglass mat with a couple of cable ties.
5. to connect the resistance wires to the lead wires we used the inner metal parts of luster terminals since the resistance wire is really hard to solder.
here's a drawing of the wires inside the blanket. the red and blue ones are the lead wire. where the resistance wires cross one of the lead wires we stacked some of the drywall tape on top of the lead wire to keep the wires from touching.

6. now it was time to mix up the silicone resin. we used one full can (1000grams) for each blanket. first we saturated the fiberglass mat without the wires and then put the other one on top of it after pouring some more resin on the areas where the lead wires meet the resistance wires.
after saturating the second fiberglass mat we just had to wait for everything to cure.
now a couple of weeks later we got to test it for the first time and it works like a charm!
here's some photos of the finished blanket (in some of them you can see the wires glowing through the fiberglass mats):


with the controller turned up about halfway

wires shining through.

wires shining through around the lead wires.

the lead wire where it exits the blanket. we pulled at it really hard and the zip ties hold it firmly in place.

let me know if anything needs more explanation.
btw, since all the materials used are rated up to at least 500°F we could easily use it for a dye sub press it has more than enough power to reach the temperatures needed.
ironed out the heat build-up issues where the resistance wires meet the lead wire by placing the resistance wires further apart from each other.
unfortunately most of the photos we took were lost in a computer crash, so I'll try to describe what we did in a little walkthrough.
1. we cut two fibreglass mats a little bigger than the heated area we planned for. we used some 300g/m² biax that we had lying around.
2. we drew some guide lines on one of the mats so we could place the resistance wire more easily.
3. we applied the resistance wire to the mat using fiberglass drywall joint tape to hold it in place. we use five lengths of resistance wire connected in parallel.
here's the tape i'm talking about (can be found in any hardware store):
4. then we placed the blank lead wire on the mat. again holding it in place with some drywall tape. the insulated part of the lead wire that exits the blanket is attached to the fiberglass mat with a couple of cable ties.
5. to connect the resistance wires to the lead wires we used the inner metal parts of luster terminals since the resistance wire is really hard to solder.
here's a drawing of the wires inside the blanket. the red and blue ones are the lead wire. where the resistance wires cross one of the lead wires we stacked some of the drywall tape on top of the lead wire to keep the wires from touching.
6. now it was time to mix up the silicone resin. we used one full can (1000grams) for each blanket. first we saturated the fiberglass mat without the wires and then put the other one on top of it after pouring some more resin on the areas where the lead wires meet the resistance wires.
after saturating the second fiberglass mat we just had to wait for everything to cure.
now a couple of weeks later we got to test it for the first time and it works like a charm!
here's some photos of the finished blanket (in some of them you can see the wires glowing through the fiberglass mats):
with the controller turned up about halfway
wires shining through.
wires shining through around the lead wires.
the lead wire where it exits the blanket. we pulled at it really hard and the zip ties hold it firmly in place.
let me know if anything needs more explanation.
btw, since all the materials used are rated up to at least 500°F we could easily use it for a dye sub press