Ski build before retirement

Document your personal work here. Show photos, movies, and share your secrets.

Moderators: Head Monkey, kelvin, bigKam, skidesmond, chrismp

OAC
Posts: 961
Joined: Thu Jul 23, 2009 9:34 am
Location: Sweden
Contact:

Ski build before retirement

Post by OAC »

Image
Hi people!


I'm an old fart soon turning 50! (What happened? I was 20 yesterday!...) And the goal has turned from just doing it to doing it before fifty...or so...anyway.
I have finally got some speed in the process of making own skis! I've been shadowing you all for about 2 years now. I started out very enthusiastic and was thinking that it woudn't take longer than a couple of months!! But I got stucked somewhere between making a perfect template and cutting/shapeing the core in a quick and reliable way. Another big issue has been the tools. Buy good and well known brands of tools! Buying cheap stuff always breaks and slow you down. Not saying that you should buy expensive stuff. But there is some relation there...I've been there! I'm on my third planer, second jigsaw, second router and so on...the tablesaw is broken but I fixed it. The saw blade on the circular saw is changed to a "expensive" one, what a change!

Regarding the template, I cheated... :oops: . I got it CNC'ed professionally. Otherwise I have had gone nuts without having a nice smooth "edge line" along the ski. Cutting it with a jigsaw wasn't that fun...so to speak.
The core issue is presented in the "tool and equipment" forum.

In an early stage I decided to go with vacuum instead of mechanical press. I had some different approaches with the mold, but ended up with the "333" type of mold and bagging. A steel sheet shaped as the ski. And a plastic tube as a vacuum bag. This method dosen't take up that much space either. Which is good.
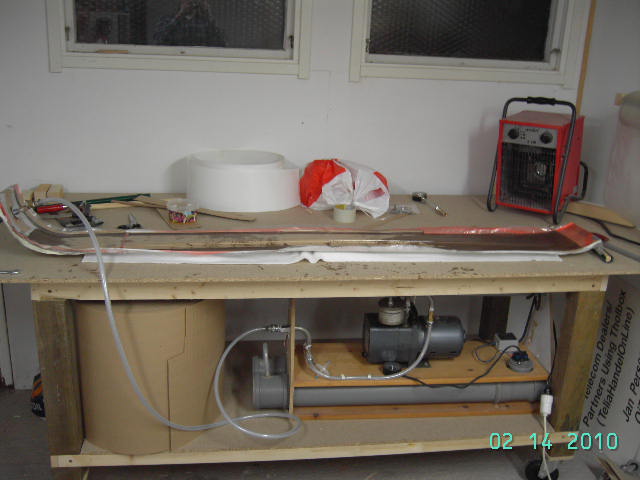
Image
My setup.

Since I don't use the core all the way up in the tip. This method is enough. With this I mean that the mold is strong enogh. If you have the core in the tip I think you need a stronger mold. Because the core/ski will flatten out the steel sheet/mold. One could use a thicker steel sheet. But then it will be heavier.

The vacuum setup is 100% "Joewoodworker" (Although it dosen't look that nice)

Otherwise I think I been doing the same stuff as you do.
Buying materials, building molds, laminating core, cutting core, shapeing core, glueing, planing, cutting fiber...

Here are som pics from the workshop:
Image

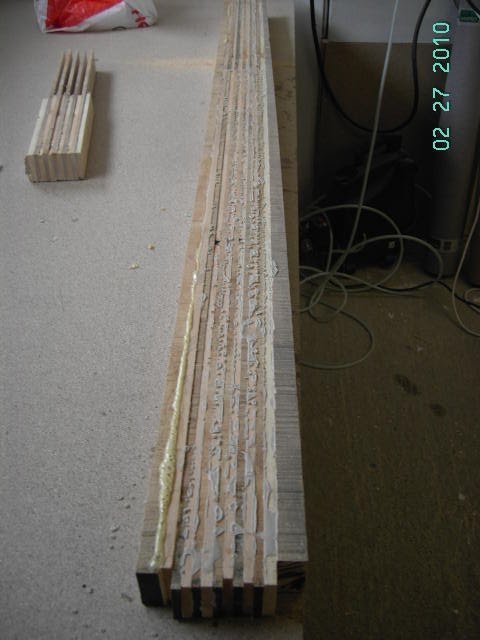
The core, Maple and fir

Image

One pair of skis = two cores... :)

Image

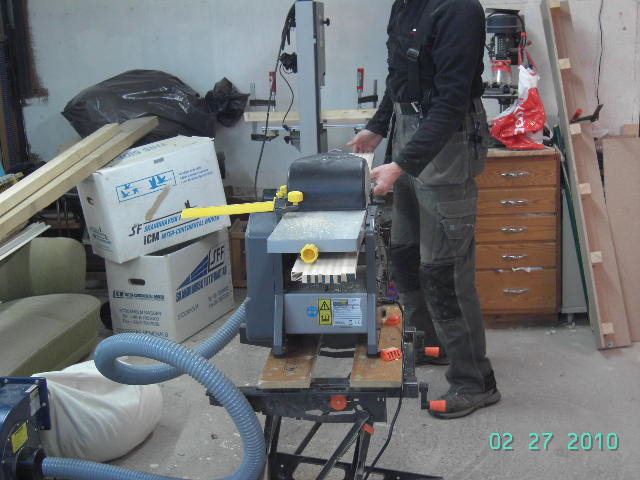
Plane for thickness (11mm)

Image

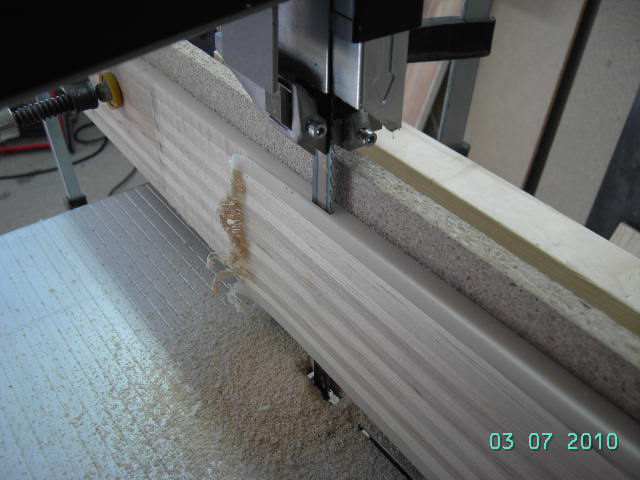
Taper the core down to 2 mm

Image

Not the finished product, but pretty close! I will cut them out on friday, tune them on saturday and ski them next tuesday! Future reading will be post in the "How did the work" forum next week...or so...
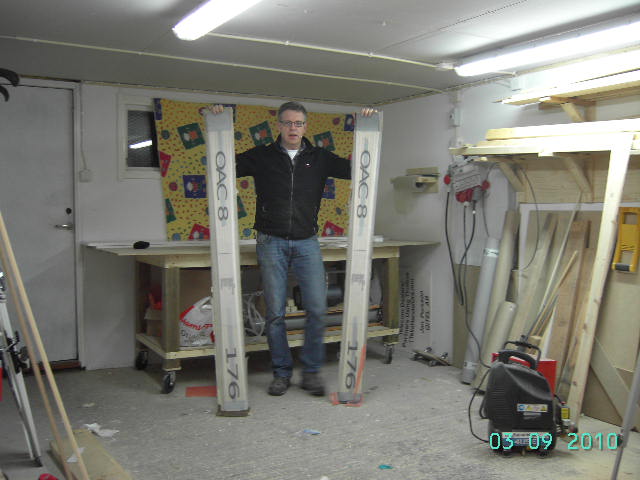
The specs.:
Name: OAC 8
Length: 1760mm
Tip: 130 mm
Waist: 80mm
Tail: 110 mm
Radius: 17m

And of course, I used Dan Graf's excellent ski design app!


Material:

White P-tex base
Steel edges, regular
Two layers of Triax 22 oz (625 gr)
Two strips (25 mm) of Uni Carbon fiber strips. One under the core and one over, I have no idea how much this will effect the flex. Testing is a good start.
One extra triax sheet under binding.
Design sheet with letters and numbers on. I thought this should turn out white. It just dissapeared into the epoxi!
350 gr. epoxi per ski. From http://www.kompositfabriken.com/ Swedish
Pretty good stuff!
And a top sheet from Extreme skis in Åre, Sweden. (I wanted a glossy one but they only had matte in stock.)

So far so good...

Cheers for now!
Last edited by OAC on Thu Mar 11, 2010 11:40 pm, edited 2 times in total.
Jekul
Posts: 240
Joined: Thu Nov 05, 2009 12:06 pm
Location: Arvada, CO
Contact:

Post by Jekul »

Looks like a nice setup and there is plenty of room for expansion in your workshop :D

By naming them OAC 8 does that mean this is your 8th pair?
OAC
Posts: 961
Joined: Thu Jul 23, 2009 9:34 am
Location: Sweden
Contact:

Post by OAC »

No it's the model name. I don't know where the "8" came from. There is no 1, 2, 3, 4, 5 , 6 or 7... ;) The OAC stand for "Onsala Alpine Club" which is a negation since Onsala is no alpine terrain!... 8)
This is infact the second pair. The first was too soft and was more of a POC.
skidesmond
Posts: 2337
Joined: Tue Apr 07, 2009 3:26 pm
Location: Western Mass, USA
Contact:

Re: Ski build before retirement

Post by skidesmond »

OAC wrote:Image

Hi people!

(Sorry for the tiny pictures!)

I'm an old fart soon turning 50! (What happened? I was 20 yesterday!...) And the goal has turned from just doing it to doing it before fifty...or so...anyway.....
50 isn't old! It's experienced! :) I'll be hitting the same mark later this year. I couldn't agree more when it come to tools. Buy the best you can afford. And know what the limits of the tools are to prevent disappointment or wrecking a ski after a lot of hard work has gone into it.

I have a Sears Craftsman 1/4 bit router that's got at least 15+ years on it. It's time to trade up since it no longer will hold the depth of the bit firmly. The body has too much vibration. I have a nice Freud 1/2 bit plunge router, very HD, but it's a big piece of equipment to gently router recess for edges. I need to either build a router table for it or buy another small router, maybe a trim router.

Nice skis! looking forward to reading how they worked.

SKI ON!
User avatar
shopvac
Posts: 160
Joined: Sun Oct 12, 2008 2:23 pm
Location: Colorado

Post by shopvac »

can your bandsaw method for profiling cores do the entire length of the core at one time from 2mm to 11mm back down to 2mm? Why are the photos so small? Anyway you can make them larger. I would really like to see the photos on your other page about using the bandsaw in a little bit bigger size. The skis look like they will be fun.
OAC
Posts: 961
Joined: Thu Jul 23, 2009 9:34 am
Location: Sweden
Contact:

Post by OAC »

No, I taper the front and the back of the core, one at the time. So two passes per core. You need to adjust the angel of the jig corresponding the length of the taper.
I will post the "sketch" and lager pictures later today.
sammer
Posts: 933
Joined: Wed Dec 19, 2007 10:37 pm
Location: Fernie B.C.
Contact:

Post by sammer »

I thought I, at 47, was probably the oldest person here 8)
Glad to see us "old guys" are getting it done.
Keep up the good work.
Please post bigger pics "old guy glasses" aren't helping.

sam
You don't even have a legit signature, nothing to reveal who you are and what you do...

Best of luck to you. (uneva)
User avatar
falls
Posts: 1458
Joined: Tue Oct 27, 2009 5:04 pm
Location: Wangaratta, Australia

Post by falls »

If you made a jig like you would use for the planer method and put it on the side it could work. You would need to be able to fix the core to the contour of the crib then just run it past the bandsaw using a parallel fence offset at the right distance.
The idea would be a bit like doughboys router setup just using the bandsaw to make the cut and having it up on its side

biggest trouble would be fixing the core to the contour of the crib using a method that won't foul the bandsaw blade
Don't wait up, I'm off to kill Summer....
ben_mtl
Posts: 583
Joined: Mon Mar 31, 2008 1:47 pm
Location: Sherbrooke, Quebec
Contact:

Post by ben_mtl »

Hence the "portable sawmill" idea : the bandsaw is horizontal and can run on 2 rails... or the bandsaw is fixed and you run your jig+core through it.
Would be easier to hold the core horizontal on a crib than vertical.

Problem is like many of us I only have 1 bandsaw and use it for lots of things... it takes more space also, and that's another of my problems...
A bad day skiing is always better than a good one at work...
OAC
Posts: 961
Joined: Thu Jul 23, 2009 9:34 am
Location: Sweden
Contact:

Post by OAC »

Yes, I have thought about it. I was thinking of having a (or two) spring supported wheel (inline skate wheel) pushing the core to the contour of the jig when it passes the blade...? But I don't know? I might think awkward here.
skidesmond
Posts: 2337
Joined: Tue Apr 07, 2009 3:26 pm
Location: Western Mass, USA
Contact:

Post by skidesmond »

:idea: Do we need an FOG (Freakin Old Guy) forum? The font could be set at 24 for easy reading and only accept large pics for easy viewing ;) Just kidding.....

Nice compact setup. I may toy around with profiling cores w/ a jointer, I don't have a band saw (yet). I'll post the process if I do. It would save lugging a planer crib, even though I like that method. But since becoming an FOG (no choice of my own), I'm dealing with a herniated disc at the moment.
OAC
Posts: 961
Joined: Thu Jul 23, 2009 9:34 am
Location: Sweden
Contact:

Post by OAC »

FOG update in the first post...if you can see the change... :)

Updates in the "tools" forum aswell
http://www.skibuilders.com/phpBB2/viewt ... 5706#15706
User avatar
falls
Posts: 1458
Joined: Tue Oct 27, 2009 5:04 pm
Location: Wangaratta, Australia

Post by falls »

Yeah the horizontal bandsaw would be better than vertical. I thought also that wheels on either side of the bandsaw blade to keep the core on the crib is the way to go.
It is really just like using a thicknesser only quicker because you need only one cut. I wonder if you could modify a thicknesser to allow the bandsaw blade to run horizontally through the machine at the same level as the spinning cutters lowest point?
It could be a purpose built ski core making tool. The coremaster 3000?
Don't wait up, I'm off to kill Summer....
OAC
Posts: 961
Joined: Thu Jul 23, 2009 9:34 am
Location: Sweden
Contact:

Post by OAC »

Have you seen the ELAN production video? When they run the core thru their "Coremaster"...it takes 2 sec! Having that in the workshop is nothing else than a wet dream!...:D

http://elanskis.com/pcc.asp#xpath=/good ... n#lang=eng

The best part in that video is when Ingemar Stenmark and Bojan Krizaj comments the skis! Priceless! My old heroes!!
User avatar
falls
Posts: 1458
Joined: Tue Oct 27, 2009 5:04 pm
Location: Wangaratta, Australia

Post by falls »

yeah I saw that video. The bandsaw moves rather than the core I think? would have to be computer numeric controlled I reckon to feed the core at the right rate and move the bandsaw at the right rate.

By the way - not taking away from what you have achieved. Very quick and impressive. The question of whether a curved profile rather than a linear taper gives you a significantly better flex pattern is probably is the key one of whether it is actually worth going to the trouble of upgrading your design.

edit: actually i was commenting on the video posted earlier in this thread. just watching the elan one now.
Don't wait up, I'm off to kill Summer....
Post Reply