
The Z-Zero touch plate is sooo easy to do : a blank PCB board, couple meters of wire -» done !
I've set up a button on the gamepad to switch from continuous to step-by-step modes...
Weird Room '2013/14
Moderators: Head Monkey, kelvin, bigKam, skidesmond, chrismp
-
IslandRider
- Posts: 80
- Joined: Wed Dec 19, 2012 11:00 am
- Location: Kelowna BC
I know, I know! I still haven't put limit switches on my machine, or finished the door to the control panel, or hooked up the spindle speed controller I have all the pieces for, to give you an idea where the todo list starts. All the wiring is run, I just have to mount switches and hook things up. After spending pretty much all last winter building the thing as soon as it started moving I started cutting things, then that led to more things, and its all more interesting than making parts for the machine. I'm one crash away from it getting to the top of the list I suppose. I know I'll regret waiting so long once I actually do it.
-
knightsofnii
- Posts: 1148
- Joined: Tue Jan 08, 2008 6:02 am
- Location: NJ USA
- Contact:
the whole thing really IS just a big reality based video game, for adult nerds!  .
.
My issue now is using the right bits, ones that dont suck up the material, or smash chips down into it... gonna try some downcut whitesides... but we'll see what happens, upcuts did exactly what i figured and just pull the wood up into them.
My issue now is using the right bits, ones that dont suck up the material, or smash chips down into it... gonna try some downcut whitesides... but we'll see what happens, upcuts did exactly what i figured and just pull the wood up into them.
Doug
-
IslandRider
- Posts: 80
- Joined: Wed Dec 19, 2012 11:00 am
- Location: Kelowna BC
Ya, the whole learning CNC'ing thing is a massive project of its own. Getting it to cut shapes is easy, but ridiculous how many variables there are to arrive at good results. I've been using cheap straight shanked carbide bits almost exclusively. I have tried a few carbide upcut spirals, but they just destroy the top edge of whatever I'm cutting. Haven't found compression bits, or the fancy dual curve ones locally so I'll stick with the straights for now. Cutting MDF burns them up pretty fast anyways so the cheap stuff is nice. I'd like to try to mount an air nozzle that clears chips, but it hasn't caused enough of a problem yet to bother. I find the cut packing with dust actually helps the vacuum hold down anyways.
Not much accomplished this weekend, lots of running around collecting pieces though so it should be a good week. Homebrewer friend of mine stopped by with some beers and a helper.

Got the press plumbed for air. Beers didn't help with that at all. Cheap valve I found at Princess Auto works well, but the actual porting didn't match the diagram on the side so it was a bit of mind bender to get it to work. Annoying how long some simple things take to do.

As soon as they left I blew it up for the first time. Fuggin sketchy. Center links are going to be needed for sure, a little bit too bendy in the middle. But it holds pressure. The discharge hose I bought is pretty hard compared to fire hose, and the ends wouldn't seal with just clamps. I bought one of those silicone baking sheet liners at the dollar store and cut it into strips to put inside between the clamps, worked like a charm. Need to figure something better out for the bungee on the cat track now, even doubled up it doesn't have enough pull to deflate the hose and lift the cat track without some help. Should probably start with some better angles instead of the cat's cradle mess I've got going on now. Either way, I'm pretty much done working on the press for now. Was ready to profile the cores last night, but the vacuum hold down wasn't inspiring confidence, and by the time I got it sorted out is was well past loud noise o'clock.

Not much accomplished this weekend, lots of running around collecting pieces though so it should be a good week. Homebrewer friend of mine stopped by with some beers and a helper.
Got the press plumbed for air. Beers didn't help with that at all. Cheap valve I found at Princess Auto works well, but the actual porting didn't match the diagram on the side so it was a bit of mind bender to get it to work. Annoying how long some simple things take to do.
As soon as they left I blew it up for the first time. Fuggin sketchy. Center links are going to be needed for sure, a little bit too bendy in the middle. But it holds pressure. The discharge hose I bought is pretty hard compared to fire hose, and the ends wouldn't seal with just clamps. I bought one of those silicone baking sheet liners at the dollar store and cut it into strips to put inside between the clamps, worked like a charm. Need to figure something better out for the bungee on the cat track now, even doubled up it doesn't have enough pull to deflate the hose and lift the cat track without some help. Should probably start with some better angles instead of the cat's cradle mess I've got going on now. Either way, I'm pretty much done working on the press for now. Was ready to profile the cores last night, but the vacuum hold down wasn't inspiring confidence, and by the time I got it sorted out is was well past loud noise o'clock.
Trampoline springs work great on the cat track
Fighting gravity on a daily basis
www.Whiteroomcustomskis.com
www.Whiteroomcustomskis.com
-
IslandRider
- Posts: 80
- Joined: Wed Dec 19, 2012 11:00 am
- Location: Kelowna BC
-
IslandRider
- Posts: 80
- Joined: Wed Dec 19, 2012 11:00 am
- Location: Kelowna BC
Got a home late last night and only got the bottoms done, but progress anyways. Did a clean up pass and cut the edge relief and insert pockets. Thickness is +-.1mm so far, I'm pretty happy with that. A lot more ducking around than I'd like, but I'm not going to complain for the first time. This pair will have wood sidewalls, and the ski is basically as wide as the blank at the tips. If I do this again I need to come up with a more reliable way to zero the machine on the blank, you can see a step in the tail of the left ski where I bumped it over 1/8th or so after the first bit started cutting and I noticed it wasn't centered, after what I thought was making sure it was centered. Lesson learned, after that I dry ran the rest of the toolpaths first to make sure they were going to do what I wanted. That and the vacuum table sucks, or doesn't suck for some reason. I was able to get it to hold reasonably well with the help of most of a roll of packing tape, but its still not great. There are 3 zones, and hooking the vac up to either one by itself clamps down rock hard, but it can't handle all 3 very well. I'm going to swap all that 1/2" PVC for something way bigger before I cut the next set. Original plan was to use the vacuum pump, which is why its all small diameter, but I couldn't get that to seal well enough to work. Profiling the top side tonight if all goes well.

haha, I've been working late too yesterday night :
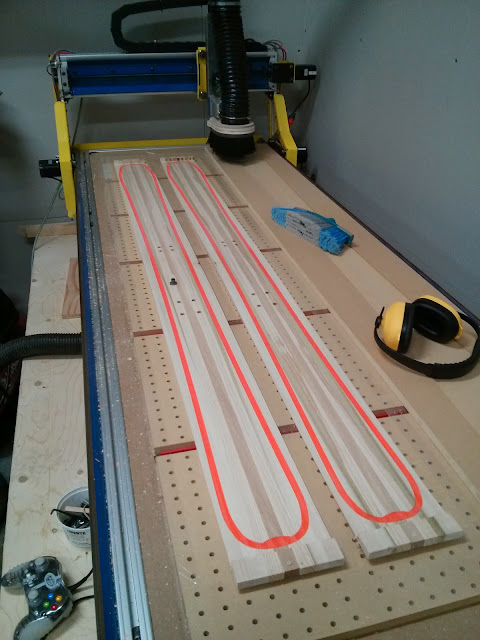
One the picture you can see how I position the cores on my table : dowels through the core and into the vacuum table (re-using the vacuum holes) : you can see one dowel on the left ski, bottom of the picture. It makes it very esay to machine the top and bottom quite accurately.
One the picture you can see how I position the cores on my table : dowels through the core and into the vacuum table (re-using the vacuum holes) : you can see one dowel on the left ski, bottom of the picture. It makes it very esay to machine the top and bottom quite accurately.
A bad day skiing is always better than a good one at work...
-
IslandRider
- Posts: 80
- Joined: Wed Dec 19, 2012 11:00 am
- Location: Kelowna BC
Looking good man. That's the plan for the next batch. I skimped on wood this time and my blanks are only 6' long so no extra space a the ends for dowels. I thought about using them anyways and just machining them off, but decided to try without first. I'm going to use insert holes to align when I flip them, but my problem is setting the position of the core in relation to the machine since I have no margin for error in y. Something like a touch off post that I could insert into a hole carefully drilled on the mid line of the blank to set 0,0 at the corner of the core. Needless to say I'm collecting a long list of things to do differently next time.
For springs I use 8-10 per side.
For dowels, could you attach two wooden tabs on the sides of the core and drill those to insert your dowel instead of into the core itself
For dowels, could you attach two wooden tabs on the sides of the core and drill those to insert your dowel instead of into the core itself
Fighting gravity on a daily basis
www.Whiteroomcustomskis.com
www.Whiteroomcustomskis.com

-
IslandRider
- Posts: 80
- Joined: Wed Dec 19, 2012 11:00 am
- Location: Kelowna BC
Ya, I'm using a shop vac, still doesn't work well over the whole table, and I think its because there's just too much lost in the plumbing to get there and it can't keep up with the leaks. Going to try taping all the seams tonight before I get going to see if that helps. The vac motor doesn't even load up so its getting a lot of air from somewhere.
The vacuum pump works awesome to hold smaller things in just the center section, but not at all over the length of 2 skis. I use it mainly with aluminum when I want to make sure the part isn't going to move.
The vacuum pump works awesome to hold smaller things in just the center section, but not at all over the length of 2 skis. I use it mainly with aluminum when I want to make sure the part isn't going to move.
Our vacuum table is 100x260cm and we're using three vacuum cleaner motors hooked up directly to a fexible hose. If you decide to go this route make sure you get motors with a fan in the back to keep the motor cool. The flexible hose we're using is just cheap pvc corrugated tube from the hardware store. Not as flexible as the hoses that come with vacuum cleaners, but still works well (just a little loud in comparison).

Another problem with your table might be the gasket tape. If the tape protrudes from the surface of the table the cores get sucked down in between and the sides might lift up from the table creating small leaks. Maybe you should try removing the gasket tape on one side and do some test with a core blank before you redo the pvc ducting.
Another problem with your table might be the gasket tape. If the tape protrudes from the surface of the table the cores get sucked down in between and the sides might lift up from the table creating small leaks. Maybe you should try removing the gasket tape on one side and do some test with a core blank before you redo the pvc ducting.