hydrant71's pneumatic press design

For discussions related to designing and making ski/snowboard-building equipment, such as presses, core profilers, edge benders, etc.

Moderators: Head Monkey, kelvin, bigKam, skidesmond, chrismp

Post Reply
hydrant71
Posts: 61
Joined: Mon Sep 04, 2006 1:30 pm
Location: portland,or.

hydrant71's pneumatic press design

Post by hydrant71 »

i finished this press about four months ago, finally getting around to posting some pictures, sorry i took so long. i've picked up a lot of tips from this site so i thought
i would contribute back to the forum. i really appreciate everyones contributions to this site, pictures, tips, etc....

PRESS FRAME is constructed of 8X8 35lb per foot i-beams. side frames are fabricated from welded u-channel uprights and and i-beam cross members that are boxed with with steel plate. the side frames are easily
converted for a double bay press by adding more crossmembers.

LOWER MOLD has adjustable tipblocks via slotted plates, running lengths
are changed by inserting different 3/4" mdf center sections. transition from center section to tipblocks is very smooth with this design. i plan
on changing the center section to a "permanent" piece of mdf with the shortest running length i plan on building and then placing a "cattrack like"
series of mdf or hardwood blocks side by side for longer RLs. (HEAD MONKEY you should try this mod, i think it is going to work very well since you are building boards of different lengths for your customers)

UPPER MOLD is adjustable by changing the length of the center spacer section with the drilled plates. it is hung and slides on the i-beams by
aluminium angle.

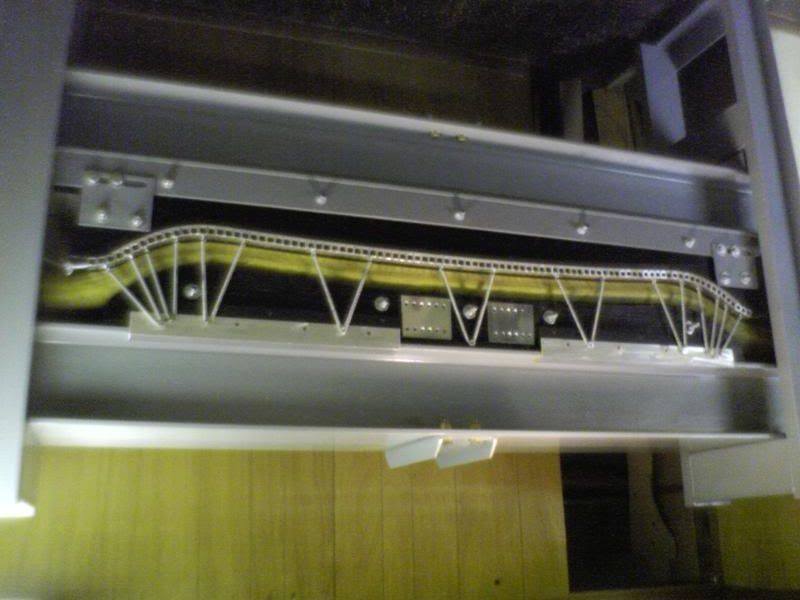
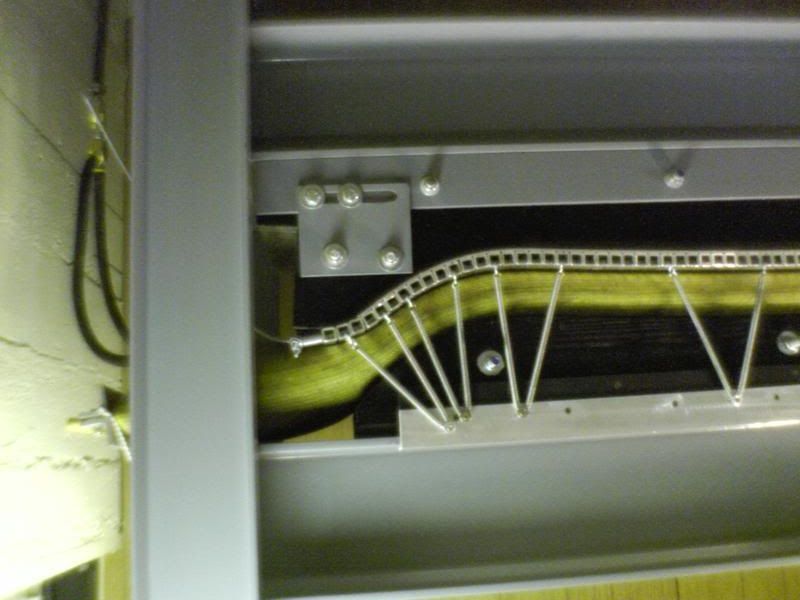
CATTRACK is radiused 3/4" X .120" alum. square tubing (i went with 3/4"
instead of 1" because i plan on eventually building some snowboards with
flat nose and tail kicks and felt the smaller size would get into the tighter
initial radius a little better.) it is suspended by a series of springs that hold
it up firmly when bladders are deflated. bladders are (2) 5" lines.

Image


Image


Image


THINGS I WOULD HAVE DONE DIFFERENTLY:
-decreased the initial throat opening of the design(used steel tube spacers
under the lower i-beams to adjust to what i needed, which was easy with my design but would have been better if i calculated right the first time)

-the tip block adjustment (slotted plate) system is way overbuilt, a simple
alum. plate fastened with sheetrock screws to the tip blocks and camber block would be sufficient because the bladders hold the tip blocks in place nicely once inflated. (would have saved me lots of time)

for loads of more pictures of my pressframe, adjustable mold, laser cut
camber block router jig, tip block router jig, and other stuff, check out
http://www.flickr.com/photos/hydrant71/


long live american made skis and snowboards.

Jason
G-man
Posts: 600
Joined: Sat Mar 25, 2006 3:58 pm
Location: northern sierra nevada

Post by G-man »

Very nice work Jason. Thanks for sharing all of the pics and info.

G-man
User avatar
endre
Posts: 413
Joined: Sun May 01, 2005 8:51 am
Location: norway
Contact:

Post by endre »

nice press! looks very professional.
Doughboy
Posts: 4
Joined: Wed Aug 10, 2005 1:56 am
Location: Sweden

Post by Doughboy »

Absolutely stunning work!!!!
Listen to Black Sabbath!
User avatar
zachjowi
Posts: 110
Joined: Sat Aug 26, 2006 10:41 am
Location: WI

Post by zachjowi »

I really like your design of the mold and I think I will try to make one like that. Do you have any designs/patterns for that mold? thanks

here are more pics for everyone

http://www.flickr.com/photos/hydrant71/
hydrant71
Posts: 61
Joined: Mon Sep 04, 2006 1:30 pm
Location: portland,or.

Post by hydrant71 »

thanks for the compliments guys. sorry zachjowi, i do but the mold is for
for building snowboards, i believe it would have to much camber for the running length of skis.

jason
rockaukum
Posts: 558
Joined: Fri Nov 03, 2006 9:23 am
Location: Placerville area

MOLD INFO

Post by rockaukum »

I like your idea of the mold having a MDF center section so you can adjust it for different lengths. I am in the process of building my mold and press and I am going to try to make one press and even more important, one mold so I can press skis for me and snow boards for the kids.
My question for you is how much camber does a typical snowboard have and do you figure about 10mm of relaxation in the camber after pressing? I am going to try to replace the center section of MDF with wood that has been "profiled" to meet the required camber of a snowboard.
Thaks for the info.
rockaukum
hydrant71
Posts: 61
Joined: Mon Sep 04, 2006 1:30 pm
Location: portland,or.

Post by hydrant71 »

rockaukum,

I have found a wide spectrum of camber amounts i my research. I am not an expert on this but most seem to have around 8mm to 12mm as an average. one thing to consider is running length, shorter boards have less
than longer boards. my focus is on boards from 158cm on up so i have not looked at very many boards shorter than 158cm.

My mold is designed with 20mm of camber @ a 1200mm running length. This is what dan graf and others have used on the graf site with good
results in a unheated press so i did the same. I just pressed a board a couple days ago,
164cm with a 124cm running length and a symetrical layup, i estimate that the camber of the mold for 124cm was around 21mm or so because of the longer RL.
The camber of the finished board came in at 11mm, half of the mold camber. in this case it was a relaxation of 10mm but i believe that figuring
half of the original mold camber is a more accurate method. i am going to wait about four days after pressing before i hyper flex the board to see if it relaxes futher.
hope this helps.

jason
rockaukum
Posts: 558
Joined: Fri Nov 03, 2006 9:23 am
Location: Placerville area

Post by rockaukum »

Hydrant71,
Thanks for the informtion. I did not realize that the boards had so much camber. My son is quiclky approaching 6' and I think his current board is 156. So I'll take your information and look more closely at his board and come to some compromise between the two.

Your last comment about waiting a few days to flex the board, is this a common practice? Let me know because I'd be sooo excited after my first pressing I'd probably start checking the flex as soon as I got it trimmed up!
Thanks again,
rockaukum
hydrant71
Posts: 61
Joined: Mon Sep 04, 2006 1:30 pm
Location: portland,or.

Post by hydrant71 »

it wouldn't be the end of the world to have less camber than 8mm to
12mm, i've seen a lot of boards with less than 8mm when they are new.
i personally like riding boards with more camber. like i said before i'm by no means an expert on this stuff. maybe some of the other board builders
could chime in on this topic and give an opinion.

i have heard that room temp cure epoxies don't achieve full physical properties for days after cure to the solid state. i have flexed the board
to get an idea of the flex characteristics, but what i mean by hyper-flexing
is placing my foot in the middle of the board with all of my weight and listen for really cool crinkle and crackles as the fibers relax. :D then check
camber again to see if it relaxed any.

jason
Post Reply