Page 1 of 2
Core profile table
Posted: Mon Sep 21, 2015 1:21 am
by Akiwi
Hi All,
As winter is approaching fast, I figured it is time to change my workshop from Longboard building, and try my hand at Ski and Snowboard production.
I will be using Vacuum pressing as I have all the gear and experience for that.
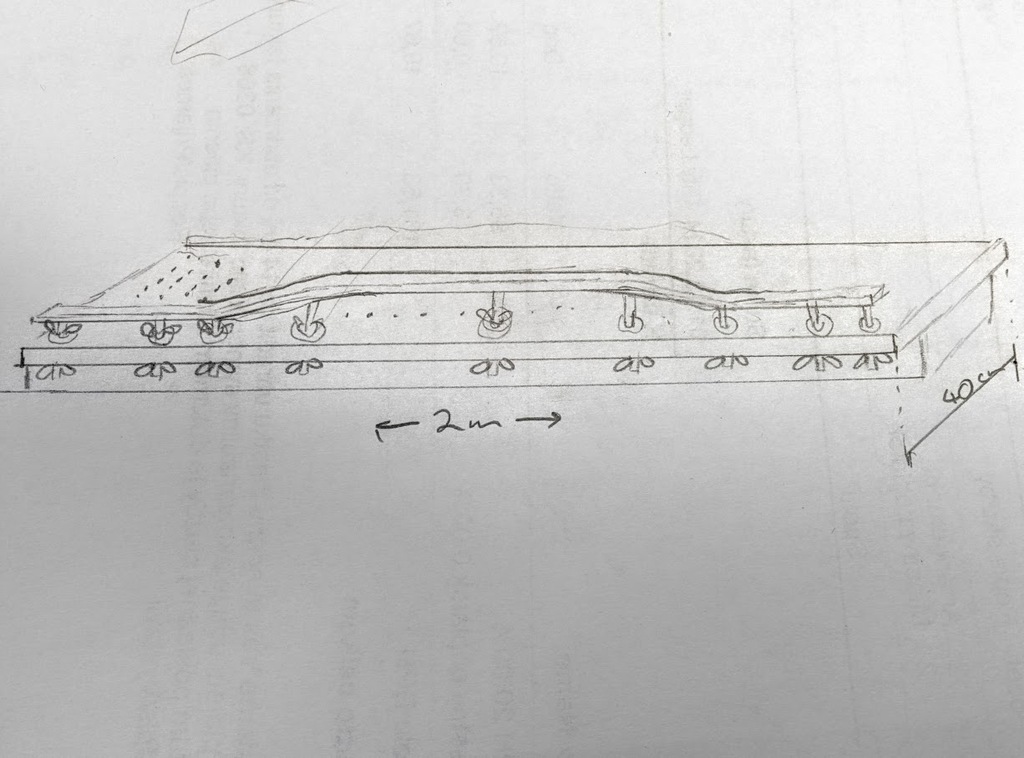
I am about to build a profiling table with vacuum hold down capabilities and wanted to check I am heading in the right direction before building a white elephant.
My table will be 2 m long and 40 cm wide, with lots of holes drilled in it for vacuum in the middle covering about 30 wide, and the entire length. MDF.
I intend to use metal strips (15mm x 3mm) with bolts welded to it left and right and use butterfly nuts to be able to adjust the height.
I am planning on 9 fixation points per side.
One thing I am not sure about is how far apart they should be. E.g. what is the standard length of the highest area of the core on ski's or snowboard.
I will use angle iron to build a sled for the router.
Please see the attached sketch for an idea of what I intend.
Comments, criticism and helpfull suggestions please.
Thanks.
[/img]
Posted: Mon Sep 21, 2015 8:31 am
by backyardskier
Trust me on this buy a planer, search around there are used ones out there for a lot less than a new one. Then make a planer jig and enjoy easy made cores.
Posted: Mon Sep 21, 2015 11:08 pm
by Dr. Delam
backyardskier wrote:Trust me on this buy a planer, search around there are used ones out there for a lot less than a new one. Then make a planer jig and enjoy easy made cores.
Second that. I am not sure why anyone would bother with a router. Maybe its because the "How To" pages have never been updated.
Posted: Tue Sep 22, 2015 12:05 am
by chrismp
With a vacuum table, router bridge setups aren't that bad (I've used both, but have a CNC now). A planer might be a little bit quicker, but I guess for most of us time is not the limiting factor.
Posted: Tue Sep 22, 2015 12:41 am
by Akiwi
Yes, and the fact that I have a Router, but not a plane. I am wanting to make snowboards and skis, so it needs to handle 30cm wide.
The cost to build is about €30. I have looked in Ebay, and the cheapest I can find there for a Plane (Hobelmachine) is €215 for a cheap new one.
If I go into ski/board production then I will go that route, but for now I need to keep my costs down.
Posted: Tue Sep 22, 2015 7:06 am
by twizzstyle
Even if you want to use a router for profiling, you really ought to be planing your cores on the bottom side so it's perfectly flat. Planers are cheap, and super handy tools (not just for ski/snowboard building)
Many people have been very successful with routers for profiling, but many more have struggled. If you plan on doing plastic sidewalls, forget the router.
Posted: Tue Sep 22, 2015 7:20 am
by chrismp
Twizz has a point. A core needs one reasonably flat side for profiling. Reasonably flat means that it is pulled flat to the vacuum table, a slight twist or bow isn't that bad if it can be pulled flat. Btw, to get one flat side on a board, you need a jointer (Abrichthobel in German), not a planer.
Profiling with plastic sidewalls is also possible if you have enough vacuum. Using a downcut router bit also helps a great deal.
Posted: Tue Sep 22, 2015 11:10 am
by mammuth
To go the cheap route bring your raw core to a carpenter and let him plane one side. For your personal luxury he can do the other side too for a beer more (will save you time, router bits). Its a matter of a few minutes on a big machine.
Then you have a good starting point for profiling the core with router or whatever. Saves lot of hassle.
You can do that with the abs sidewalls already attached. But ... to attach them its more easy to have the core planed on one side already (to get a nice 90degree cut of the outline).
Posted: Tue Sep 22, 2015 12:56 pm
by Akiwi
mammuth wrote:To go the cheap route bring your raw core to a carpenter and let him plane one side. For your personal luxury he can do the other side too for a beer more (will save you time, router bits). Its a matter of a few minutes on a big machine.
Then you have a good starting point for profiling the core with router or whatever. Saves lot of hassle.
You can do that with the abs sidewalls already attached. But ... to attach them its more easy to have the core planed on one side already (to get a nice 90degree cut of the outline).
Sounds like the best route for the start.
Posted: Thu Sep 24, 2015 5:47 am
by chrismp
One more tip: If you build a router bridge, it can double as a makeshift jointer. Check out this video to see how it works:
www.youtube.com/watch?v=J0SDvKHcL5M
I use this method on my CNC mill all the time since I don't have a large jointer/thicknesser. I start by placing the stock I want to plane on a large piece of plywood that I put on my vacuum table. Then I look for spots where the wood lies flat on the plywood and put some screws through the plywood and into the stock from below to hold the stock in place. Then I add shims to the spots where the stock lifts from the plywood while sucked down to the vacuum table to keep it from rocking. After that it's just a matter of setting the right height on the CNC/router and take off all high spots. This gives you one flat side. To get the other side flat, just flip the stock and put it directly onto the vacuum table with the freshly flattened side and take off the hight spots again till the second side is flat as well.
Posted: Thu Sep 24, 2015 1:43 pm
by Akiwi
Thanks Chris. A pretty interesting film.
I am going to make my sled out of angle iron by welding it together. Hope that is strong enough.
Posted: Thu Sep 24, 2015 3:43 pm
by MadRussian
as mentioned here.... make a router profiler is not simple proposition.while it looks simple at first but to achieve quality results were looking not simple
I'll suggest to buy a router bridge which available $150.
you might find useful information here
http://www.routerforums.com/jigs-fixtur ... -skis.html
if you want quick results DON'T go with a router bridge. If you're ready to become toolmaker it will take time.
Posted: Fri Sep 25, 2015 12:01 am
by chrismp
@Akiwi: sounds good. Just make sure you have straight angle iron and pay attention to not introduce some deformation through welding.
@MR: I know quite a few on this forum have made really sophisticated router bridge setups with ball bearings and adjustable guides and whatnot. Still, many others are successfully using simple mdf or hardwood rails for the sides and a sled made out of plywood. Kingswood skis for example still use a router bridge to profile their cores and their setup couldn't be more simple (some screenshots:
http://www.skibuilders.com/phpBB2/viewt ... ood+router and the video:
www.youtube.com/watch?v=l_vo8pua5yk). IMO a vacuum table is one of the simplest and best solutions to greatly improve any router table.[/url]
Posted: Fri Sep 25, 2015 2:40 am
by Akiwi
Yes, the Kingswood vidio was my inspiration. I'm using that as a basis, and hopefully improving on it by adding vacuum holddown, and I am using flat steel for rails rather than round. Not sure if that is good or bad.
Posted: Fri Sep 25, 2015 3:00 am
by mammuth
Do make the sled out of wood, more easy to fab, slides nicer on your metal rails. And it will be more light then metal and more easy to modify. When youre satisfied with your sled you can rebuild it out of aluminium or steel.
I did make 6 boards last winter. Cutting and planing the cores all done at a carpenters store. Was around 50 euros for all together (for the carpenters work), experimenting included. Was a good learning curve to see which machine works good and which machine creates troubles.
Profiling i tried to do first at the carpenters and switched later to profiling via sled setup. Fabricating the tools, tables and so on was 80% of ski building time at least. Keep it simple at the beginning and try to advance while building up experience.
Tools really needed for the beginning: jigsaw, (good) router. A band sander is helpful too (bought a 30 euros junk one, but surprisingly it still works)
P.s. will answer ur msg tonight, need to go to the scrap yard for my new press materials

