B's Skis

Document your personal work here. Show photos, movies, and share your secrets.

Moderators: Head Monkey, kelvin, bigKam, skidesmond, chrismp

Baumnog
Posts: 13
Joined: Sun Dec 03, 2006 2:42 pm

B's Skis

Post by Baumnog »

So I started reading this website and forum a little over a year ago after I saw an article in Ski magazine.

It is interesting to see each persons method of the construction process.

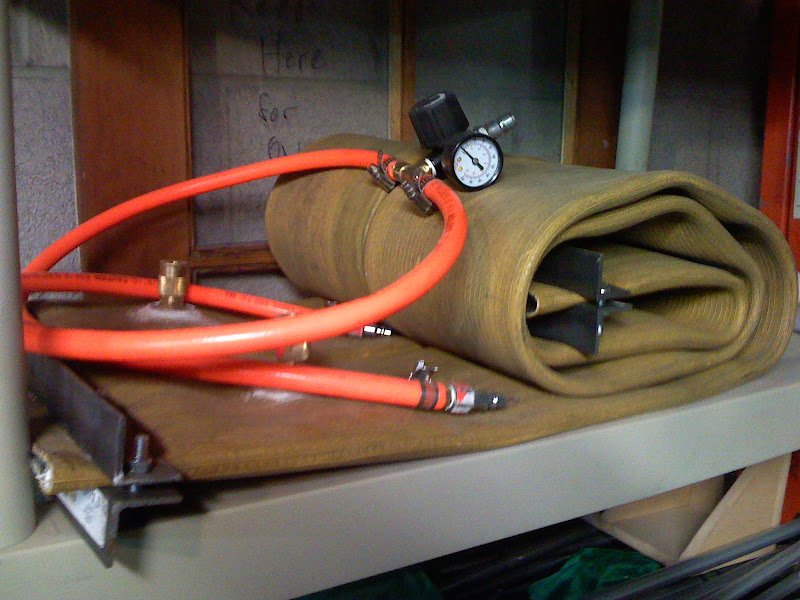
The first hurdle for me to overcome was a firehose. Where does a guy buy a firehose? Nobody in the normal world could help me out with that. Not even firemen. But the Hoseman came to the rescue and shipped me a hose. He didn't even want money for his time. I appreciated his effort and trust with shipping the hose, so I kicked in a little extra for him.

Setting up the hose to hold air took a bit of figuring out. But with time I got that together. Here is the hose together. I tested it and it held the pressure through the night. The gauge read 40psi, but my compressor stated 80psi. I don't know if this is due to the line being split, or if it is 40psi.
Image

The next step that I saw was getting my cores. I decided on maple and birch. Birch for stiffness in the center and near the rails. These are two woods I have seen often and have worked out for me on different projects in the past.
I cut them into strips and aligned them the best I could with the grain as vertical as possible. I then messed it up on layup and put two of the pieces out of order....Oh well.
Image

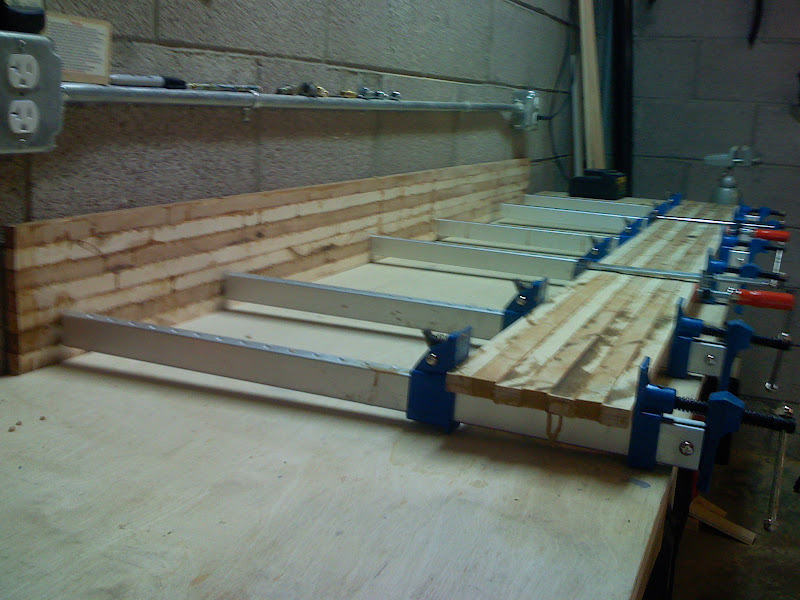
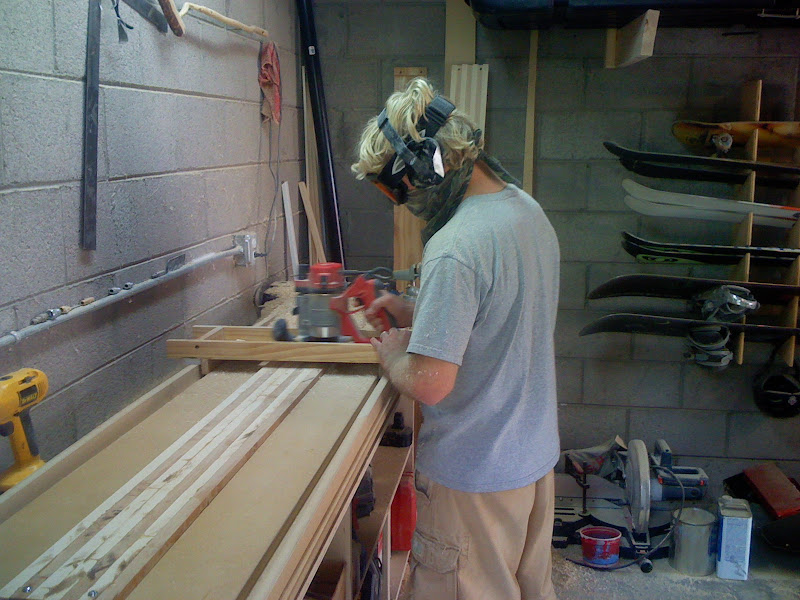
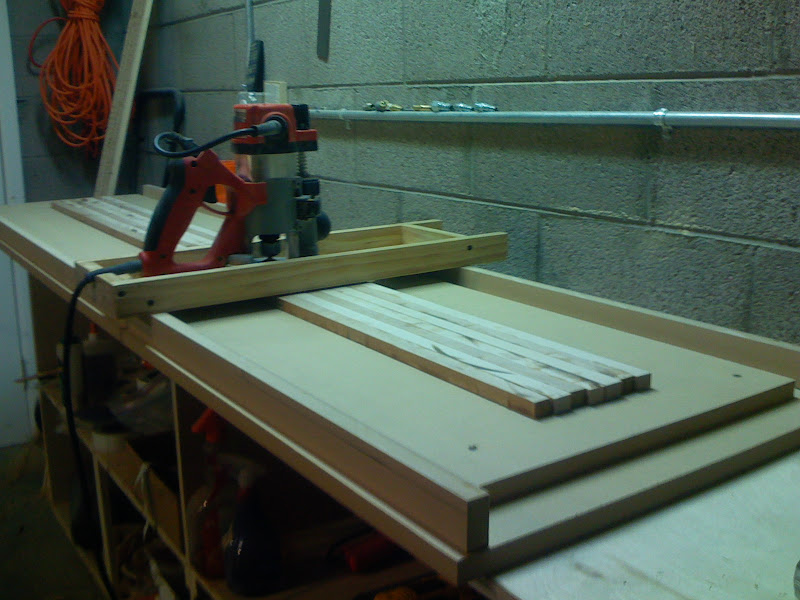
Now that they are layed up I need to plane them to the desired thickness. I decided to do 12mm in the center and 2mm on the sides. I am doing the platform under foot from center to go 12cm forward and 20cm backward before the angle.
I am trying to make each piece of this construction the best I can so it will last.

Here is the planing jig so far. I plan to clear coat it all so preserve it.
Image

My slow progress is determined by money to buy the next pieces and time to put it together. I will be uploading all of my photos to an album on Picasa that is located here if you would like to look. http://picasaweb.google.com/varnerb/Skis
ed
Posts: 11
Joined: Wed Sep 12, 2007 6:37 am
Location: Birmingham, UK

Post by ed »

Your guage looks like a regulator to me. Did you try adjusting the dial on it to increase the pressure in the bladder when you inflated it? That could be the problem...
Baumnog
Posts: 13
Joined: Sun Dec 03, 2006 2:42 pm

Post by Baumnog »

Ya, I turned the regulator up till it would fill no further. The compressor was sitting at 80psi while the regulator said 40.

Is it 40?
krp8128
Posts: 367
Joined: Fri Feb 23, 2007 1:57 pm
Location: Marcellus, NY

Post by krp8128 »

Looking at your fist pic, it seems like the gauge might be off.

With the compressor line disconnected (no pressure anywhere in the system), what does the gauge read?

I know this sounds a little odd, but I just saw a bike pump the other day that the gauge spun and read 60lbs with no pressure, they do break.

EDIT: The orientation of the gauge was throwing me off. When I looked again, it is indeed at zero.
krp8128
Posts: 367
Joined: Fri Feb 23, 2007 1:57 pm
Location: Marcellus, NY

Post by krp8128 »

Check the compressor over. Where is the gauge located?

IIRC, my compressor has two gauges, one reads tank pressure, one reads output pressure.

If you have a regulator on the compressor, it may be set to only put out 40psi, and the gauge is probably reading the tank pressure.
Baumnog
Posts: 13
Joined: Sun Dec 03, 2006 2:42 pm

Post by Baumnog »

Thanks for all the input on the pressure question.

krp8128:When Disconnected it reads zero. But it did take a long time to read any pressure when I was filling the hose up.
The compressor only has one gauge which reads the pressure of the tank. When the hose stopped filling up anymore the gauge on the tank read 80. So my thought is they balance out at the same pressure.

This weekend I was able to profile my cores. This step was one I had doubts on being able to do as well as others I have seen. But I took my time and was able to recreate the precision of others. I made my jig similar to the one in the how to guide. I used pegs on the side that are glued in place. I can then interchange different profiles if desired. I also put inserts in the center to hold the core down with. Then I can reuse without putting multipe wood screw holes in the jig.

I started by using flat rails to get an even side on the core. I then flipped it over, switched the rails, and profiled the core. I did it in two passes, to minimize the amount of material I took of with the passes. I was afraid to damage the wood or my router bit if I took off too much material with each pass.

Here are a couple pics.
Image
I used ski goggles. They worked better than safety glasses because they kept all the sawdust out of my eyes. I tried to minimize the amount of sawdust in my lungs so I wore the bandanna.

Image
The finished profile with 2mm on the ends and 12mm in the center.

My next step is building the bottom section of the mold. My goal is to have that done next weekend.
G-man
Posts: 600
Joined: Sat Mar 25, 2006 3:58 pm
Location: northern sierra nevada

Post by G-man »

Hi Baumnog,

Things are coming along nicely. Amazing how much of the original core blank ends up as saw dust, isn't it.

Not to sound like your mother, but since you are already thinking about protecting your lungs, I'd strongly suggest that your next moderate purchase be a good respirator (about $30 at Home Depot). I really regret, now, the damage that I did to my lungs when I was younger... no one around to warn me any differently. Ski building is a really nasty endeavor in terms of respiratory irritants, especially when you get to the point of working with the fiberglass elements. It'd be good to get a mask now and get used to using it anytime you turn on a piece of power equipment. That way, you'll get to enjoy more good years snow ridin' should you be lucky enough to dodge all of life's other potentially lethal bullets along the way.

Cheers,

G-man
mark
Posts: 101
Joined: Sat Mar 24, 2007 5:37 am
Location: Western Mass

Post by mark »

G-man wrote:I really regret, now, the damage that I did to my lungs when I was younger... no one around to warn me any differently.
Same here. Lungs, nervous system, imune system, etc..... :?

It's encouraging to see this sentiment expressed here.

When buying a resporator, be sure to check the msd's on any chemicals you're using and purchase appropriate cartriges for it. It may be an extra purchase to get the correct cartriges but it is sooo worth it.


http://www.conney.com/
Wheezer
Posts: 27
Joined: Mon Aug 15, 2005 11:10 am
Location: Upstate NY

Post by Wheezer »

I'd like to emphatically second what G-Man said. Damaged lungs suck big-time. Buy a respirator and WEAR it.

Not called Wheezer for nothing.
Baumnog
Posts: 13
Joined: Sun Dec 03, 2006 2:42 pm

Post by Baumnog »

Thanks to all for the concern.

I lost my respirator in the last move out to colorado. I definetly will get another soon. With just the sawdust I feel the bandana works fine.

I started the bottom section of the mold today. Things have come out good so far. Optimizing the use out of one sheet is always the challenge.
M.F
Posts: 19
Joined: Sun Apr 08, 2007 5:05 am
Location: Norway

Post by M.F »

How wide is your press and what size is the hose?

How long is your profiler?
See Skibuilders uses 80"

I'm wondering my press i slighlty too small for two 6" hoses in it so i'm thinkin about pressing one ski at the time :(
Martin
Baumnog
Posts: 13
Joined: Sun Dec 03, 2006 2:42 pm

Post by Baumnog »

My press will be 18" wide. This is the width of my two hoses together. The hoses are about 6" wide.

The length of the profiler is 84". I just took one foot off the 8' sheet so it would fit better on my work bench. The outside width is 20". Iput inserts in the profiler 70" apart off the center. The wood i will use will always be 72" long. This gives me the ability to reuse the profiler without wear.

So i am going to build the press out of wood then use thread rod and angle iron to hold it together. How many of them will I need? Where do I find capacity specs on this? I have calculated at 40 psi with two hoses six inches wide and 82 in long that would create about 39,000 pounds of pressure. Is this right?

Thanks for any insight.

The snow started falling here in Colorado, I hoe I can get these done before it opens.
Baumnog
Posts: 13
Joined: Sun Dec 03, 2006 2:42 pm

Post by Baumnog »

These last two weekends I accomplished two things.
-I got the majority of the bottom section of the mold built.
-I built a pulleyed storage for the mold.

These first pics are way way of making all this stuff and still being able to park my car in the garage.

Image

Image

At first I made this lift with only one loop through the pulleys. Then I tried to lift it. At that moment I remembered "Bill Nye The Science Guy". On his show some 15 years ago I remembered him saying the more pulleys you use the less effort you need to lift something. I know I will probably have aroung 300 lbs of weight on this lift, and I only way 150lbs. So after some trial and error I got it together.

Then I started on the bottom section of the mold. That was very repetitious routering that many pieces.

Image

Next weekend I will attach it to the base board and begin on the top.


Since I am working on a limited budget I am considering different options to hold the press together. Angle iron and 1/2" thread rod are one thought. The other I am thinking of but have not seen anybody try is using straps. Call it webbing are large straps. I am thinking of rapping multiple straps around the press then filling the hose with air. These straps say they would hold the amount of weight I have calculated. Does anybody have thoughts against this idea?

Thanks all for insight.
krp8128
Posts: 367
Joined: Fri Feb 23, 2007 1:57 pm
Location: Marcellus, NY

Post by krp8128 »

Baumnog wrote:
Since I am working on a limited budget I am considering different options to hold the press together. Angle iron and 1/2" thread rod are one thought. The other I am thinking of but have not seen anybody try is using straps. Call it webbing are large straps. I am thinking of rapping multiple straps around the press then filling the hose with air. These straps say they would hold the amount of weight I have calculated. Does anybody have thoughts against this idea?

Thanks all for insight.
That actually doesn't sound like too bad of an idea. What if you were to place another sheet of the mdf on top of the bladder, then the ratchet straps? How many straps were you thinking, and what would the spacing between straps be?
plywood
Posts: 499
Joined: Fri Oct 13, 2006 2:13 am
Location: wilen, switzerland
Contact:

Post by plywood »

i was in a similar situation: a press frame as cheap as possible.

if i get your idea right you plan to use straps made out of cloth, right?

i did it like this: i built a top mold and put the mold, the layed up skis, cat track, bladder and top mold in a "tube" which i sewed together out of cloth. so it`s pretty similar to your idea with the straps.
but i think it`s necessary to build something like a top mold. it may would work without one and just by putting straps over the hose. but a top mold creates a little more distance between the hose and the "sides" of the straps. you need to have a "flat" top section to get the best possible transmission. otherwise you lose a lot of pressure by deforming the straps... i hope you understand what i mean.
plywood freeride industries - go ply, ride wood!
Post Reply